 CYPE Architecture: Software Bim gratuito
 IDEA StatiCa Steel: Steel connections & joints
 GEO5: Geotechnical software
 IDEA BIM: BIM structural software
 ZWCAD: 2D and 3D POWERFUL CAD
 PREF: Prestressed beams
 IDEA Detail: Details in reinforced concrete
 FIN EC: Structural Design Software
 AGACAD: Bim solutions for Revit® professionals
 IDEA StatiCa Concrete: Reinforced concrete design
 IDEA Prestressing: Calculation precast elements
 Tools for ZWCAD: Strumenti per la produttività
 EurocodeExpress: Eurocodes Calculation
 BETONexpress: Reinforced Concrete
 WOODexpress: TIMBER structures
 STEELexpress: Calculation of STEEL elements
 STEELPortalFrame EC3: STEEL Portal Frames Calculation
 SteelSectionsEC3: Design tables for Steel Sections
 3DMacro: Masonry calculation
 Histra Arches and Vaults: Historical Structures Analysis
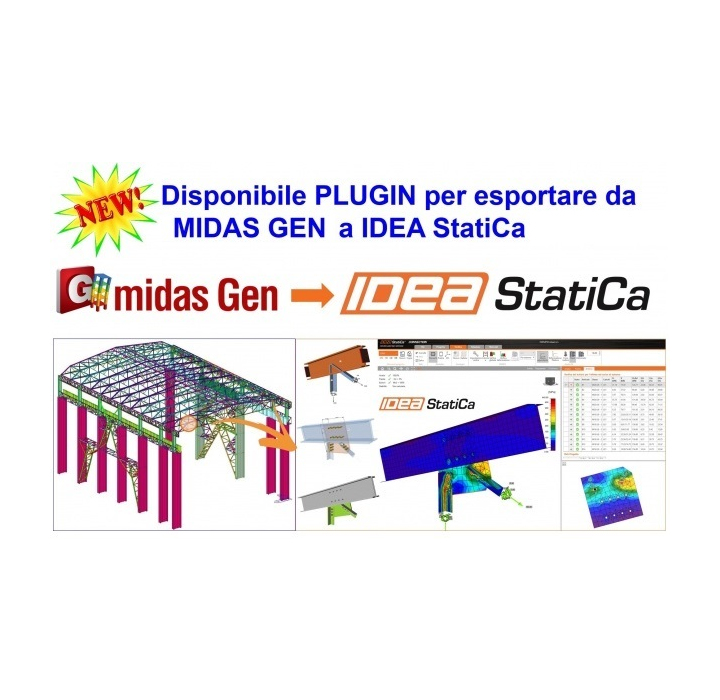
 IDEA StatiCa works with your Midas Civil and Midas Gen. You can select any number of steel connections in Midas Civil and export it to IDEA StatiCa for structural design and code-checking. IDEA StatiCa and Midas give you an efficient workflow for your structural steel design that saves time, minimizes errors, and opens up optimization possibilities.
Download the Tutorial about Midas Gen BIM link for Steel design
Download the Tutorial about Midas Gen BIM link for Concrete design
FEATURES OF THE MODULE
- Midas and IDEA StatiCa are automatically linked
- Select the node in Midas and directly open it with IDEA
- Import of load combinations
- Link for steel connection and members

Export, design, generate a report
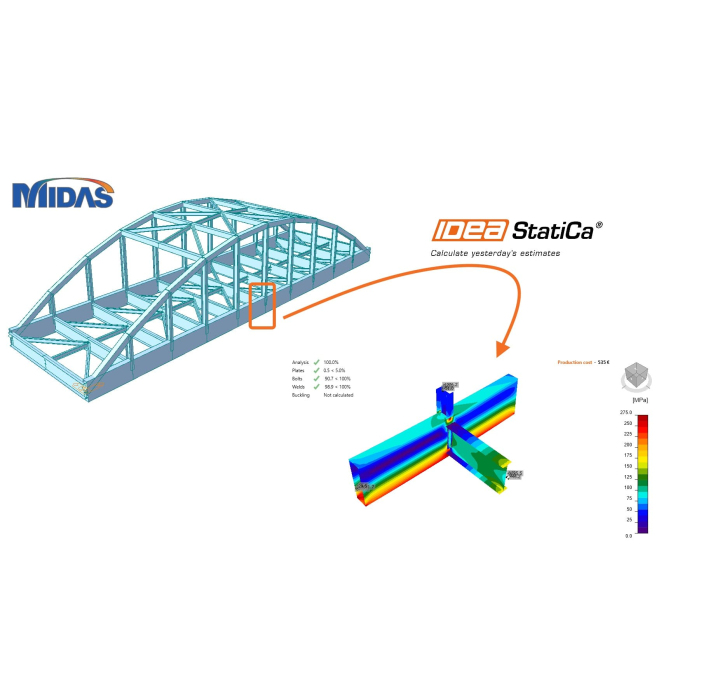
Ready to solve various steel connections? Midas combined with IDEA StatiCa will allow you to model, design, load, and check steel connections of any topology and loading. And make this data available to your colleagues or subcontractors doing detailing and fabrication.
With this tutorial, you will learn how to export bridge to IDEA StatiCa BIM where you select the connection for code-checking in the IDEA StatiCa Connection application
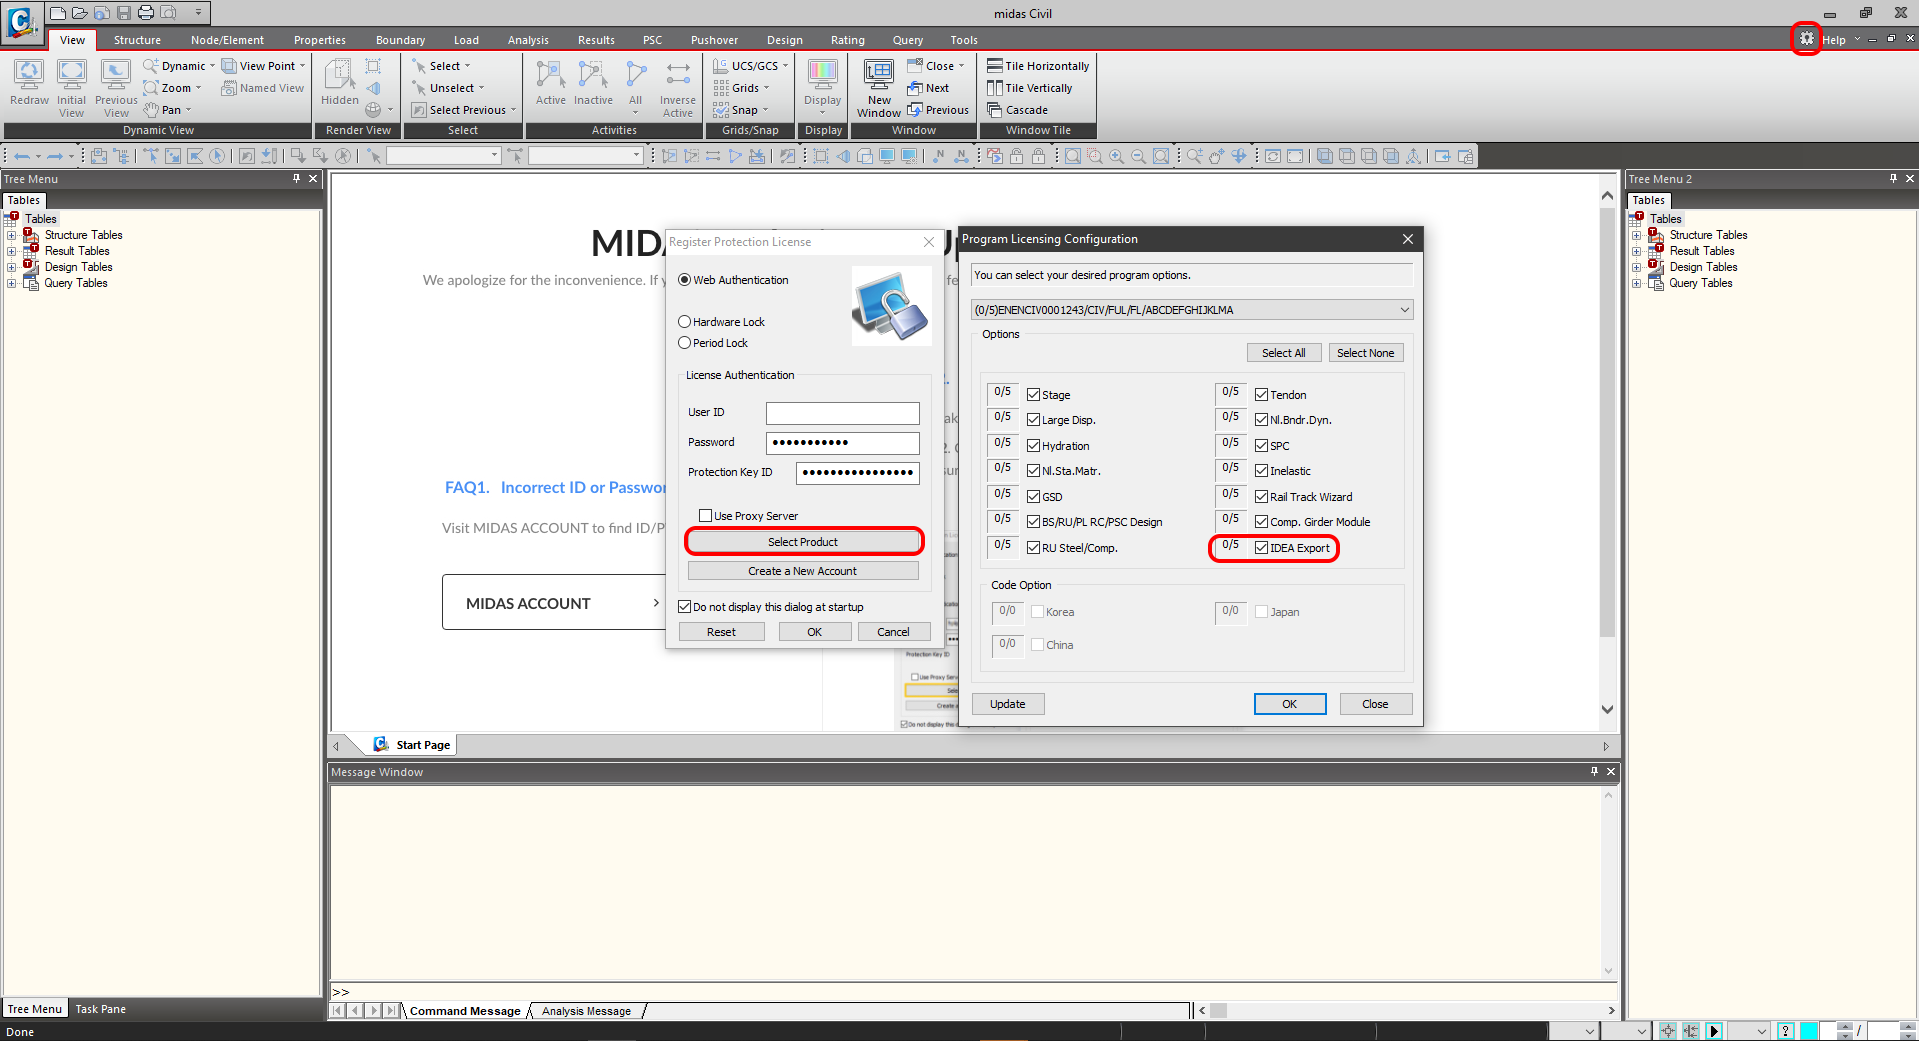
1 Activation
Since the version, Midas Civil 2020 3.2 and newer has been added the activation checkbox to the Program licensing configuration.
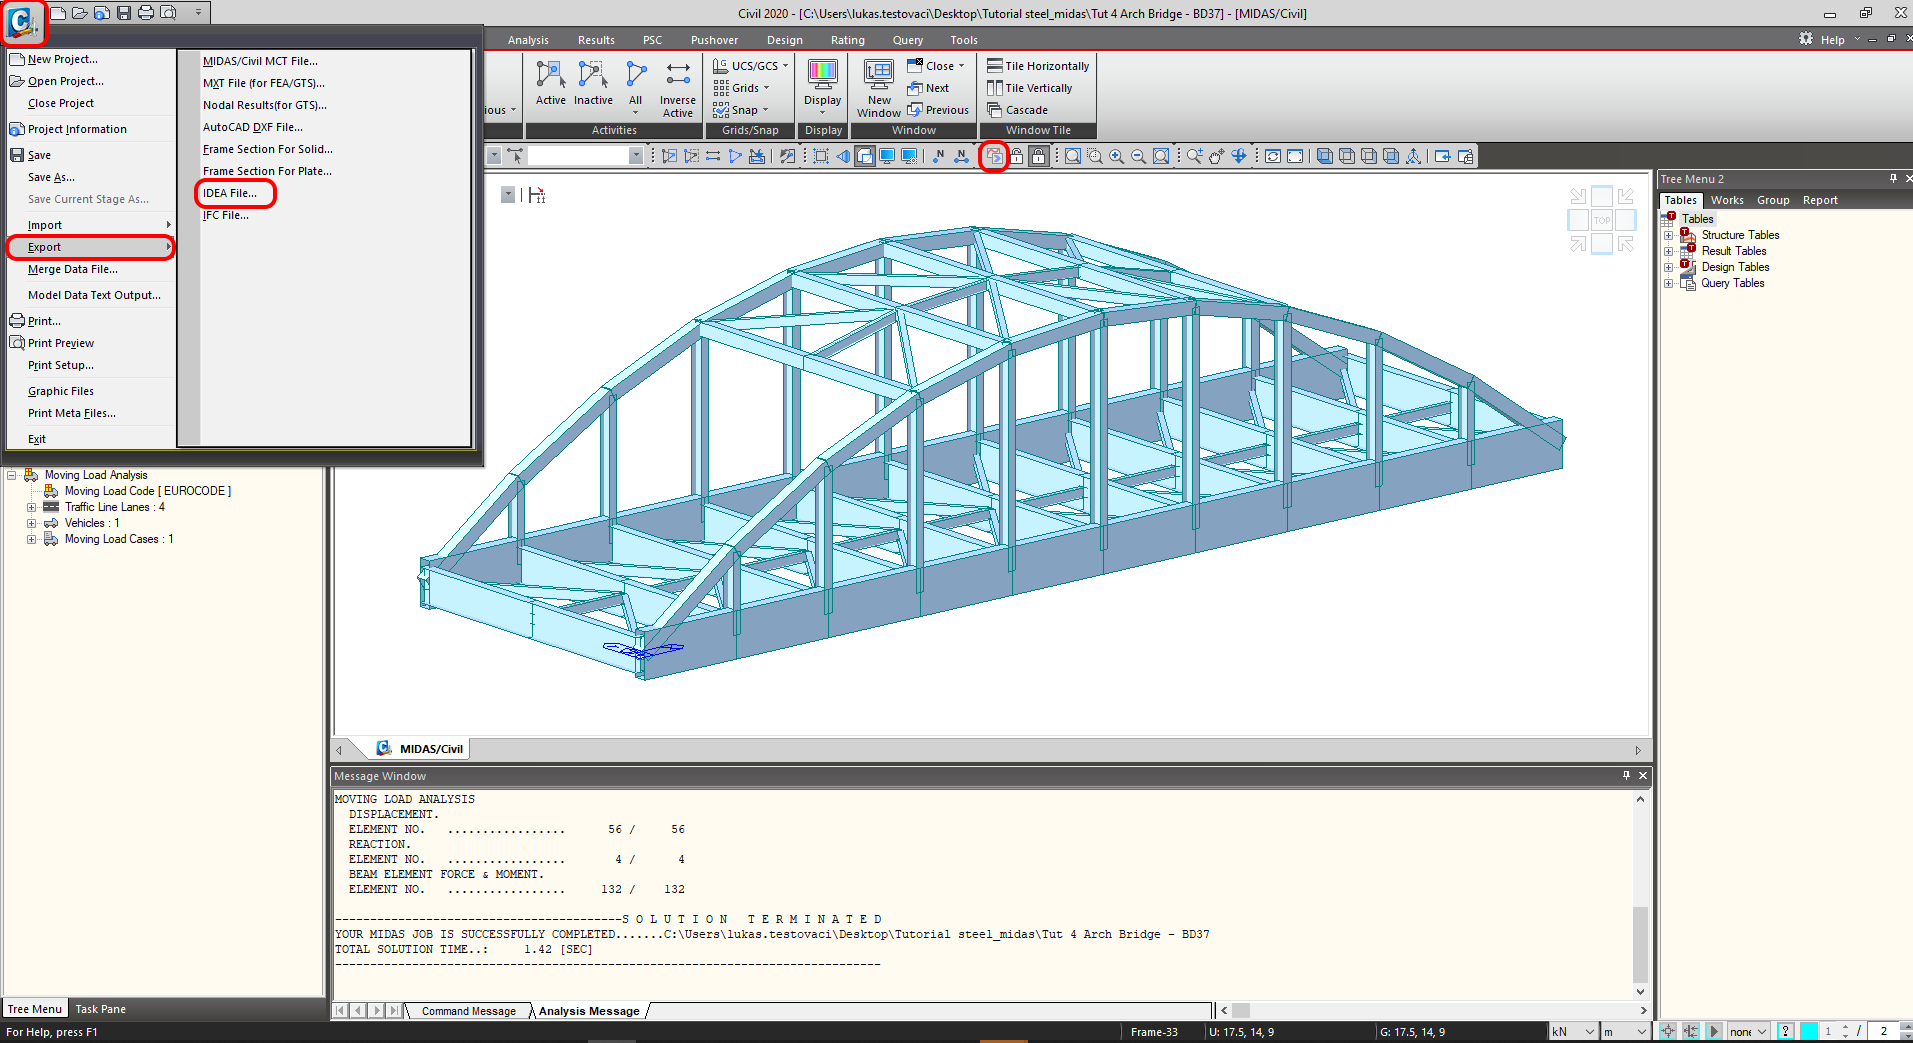
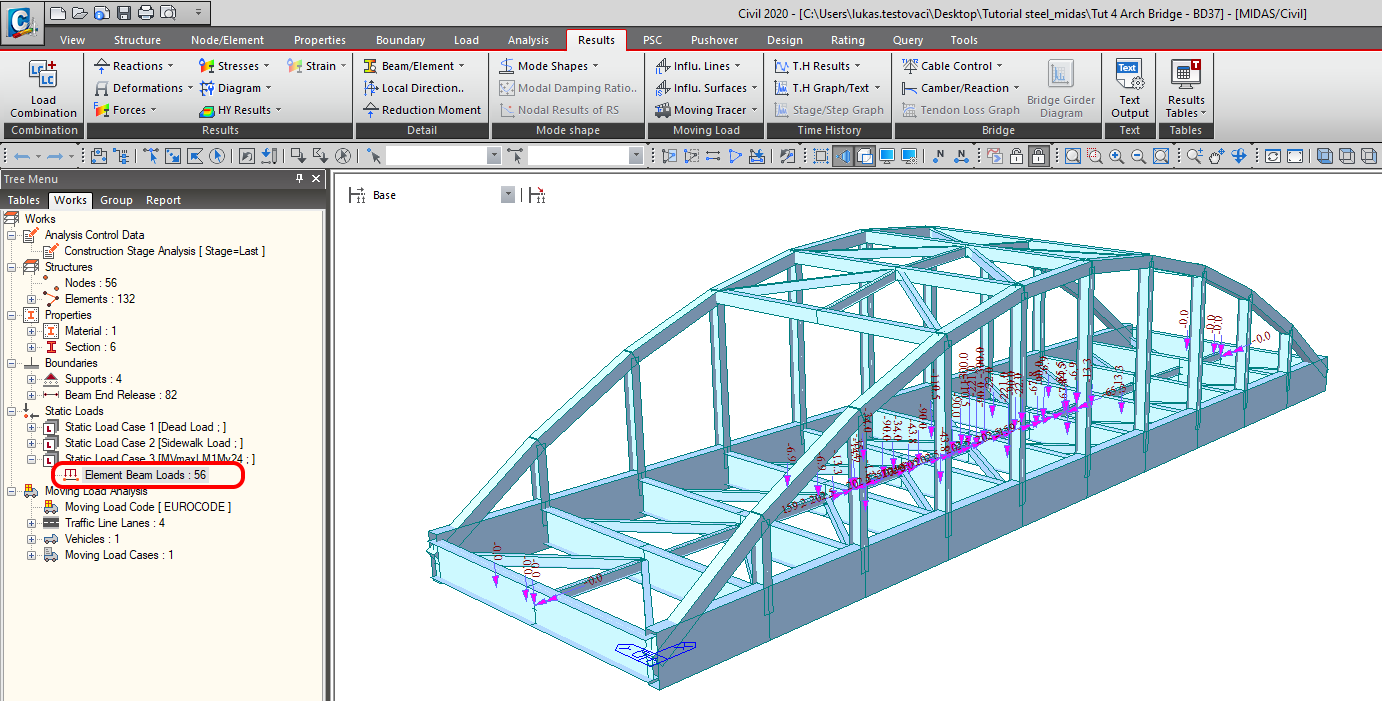
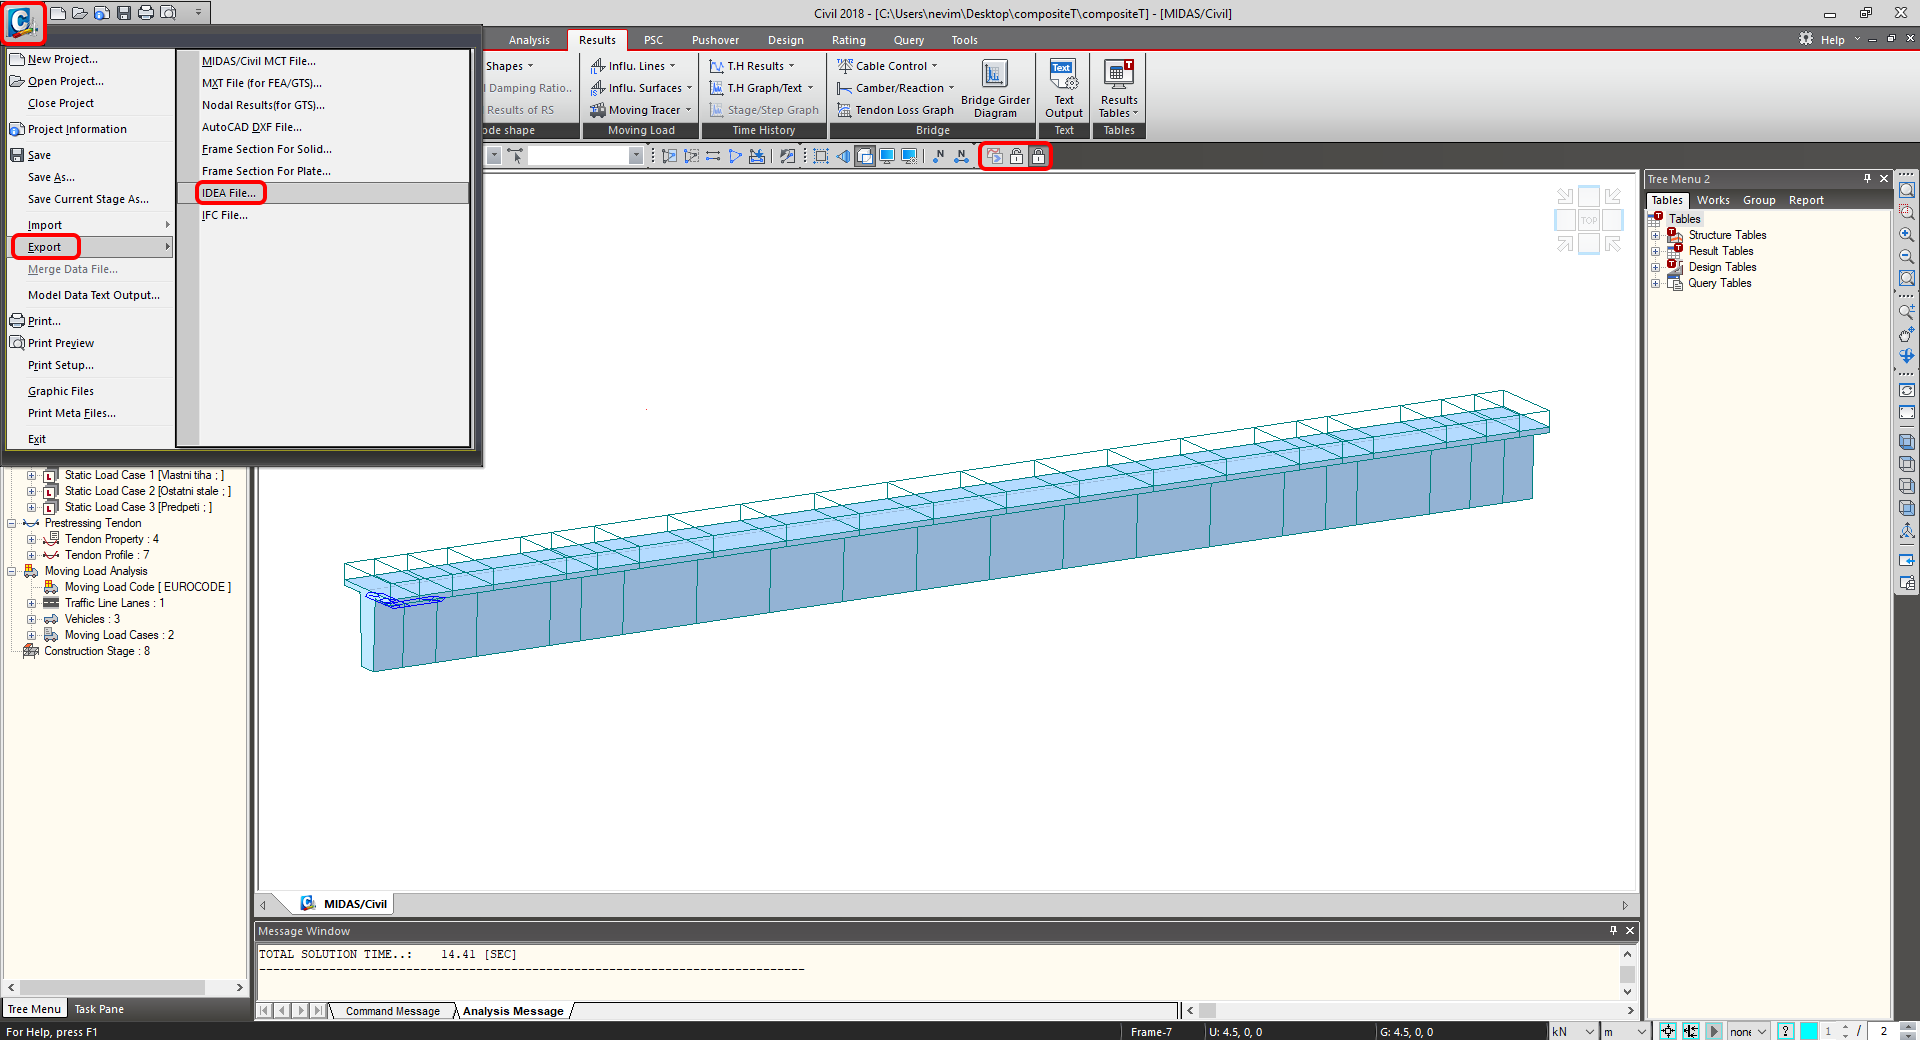
2 Export
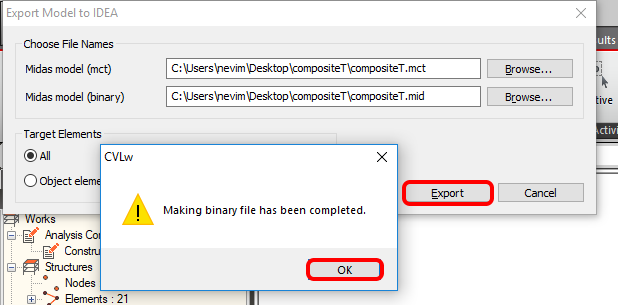
At first, run the linear analysis to get the internal forces. After analysis, go to the menu tree where will be available Export-->IDEA File.
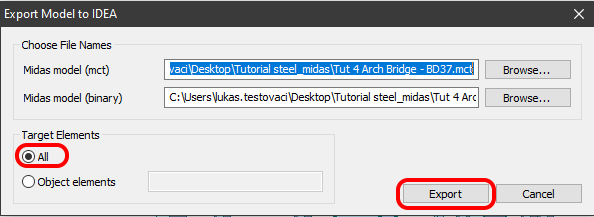
Select the path where will be saved the mct. and mid. files. Both files are necessary to have in the same folder. Otherwise, the import to IDEA StatiCa BIM won't be accessible.
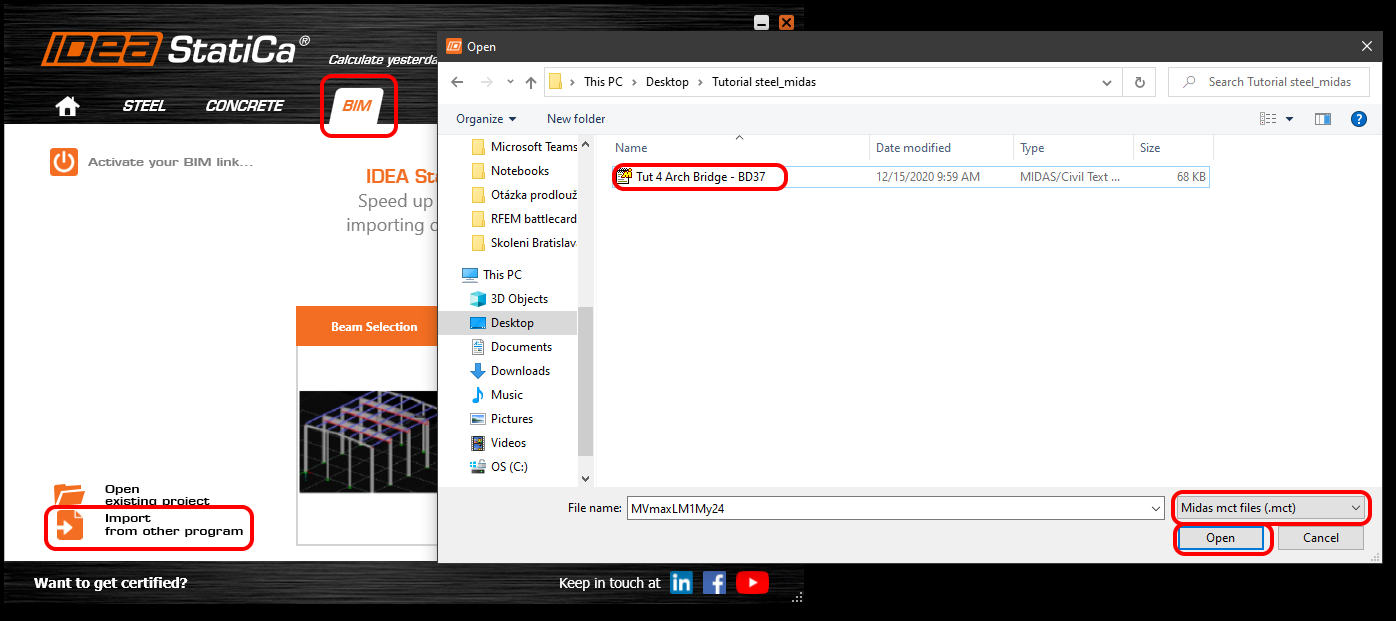
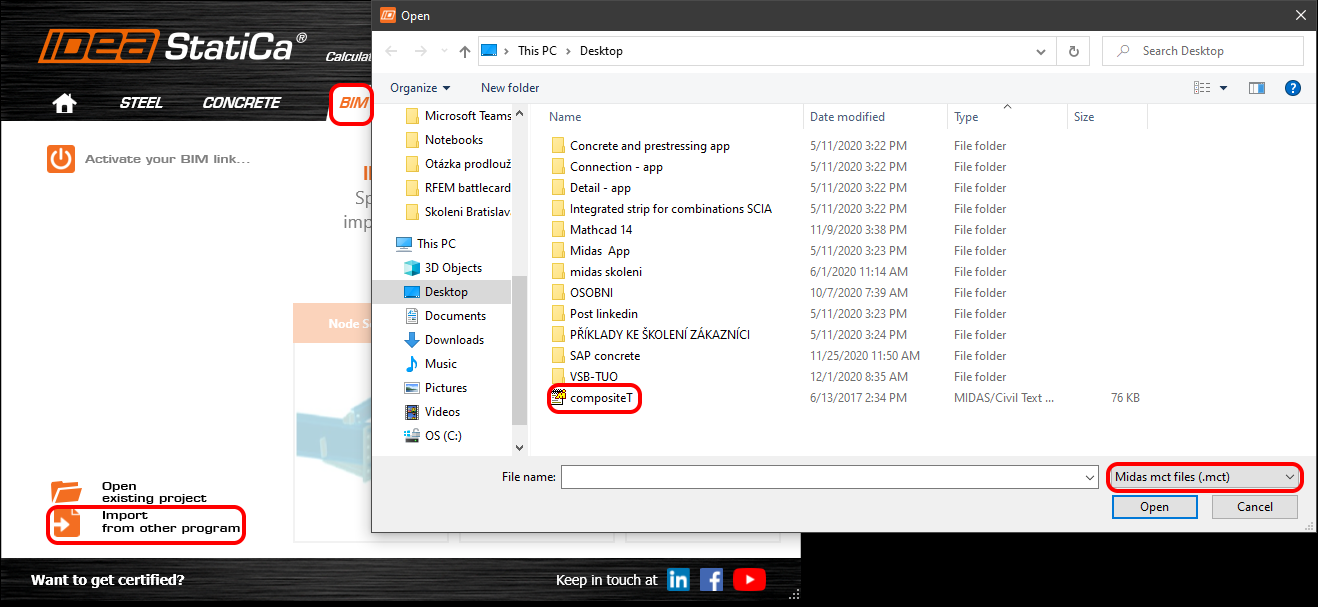
3 Import
Launch IDEA StatiCa application and move to BIM part. Press the Import from other programs and select the Tut 4 Arch Bridge -BD37. The selection of the .mct file will be allowed if you scroll down the menu of supported FEM programs and select Midas mct Files(.mct).
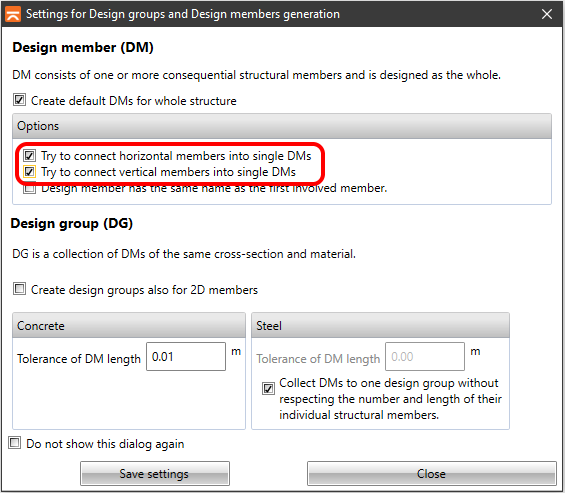
You can sort the design members into groups. It's suitable from the design point of view. The members assigned to one group are checked at the same time.
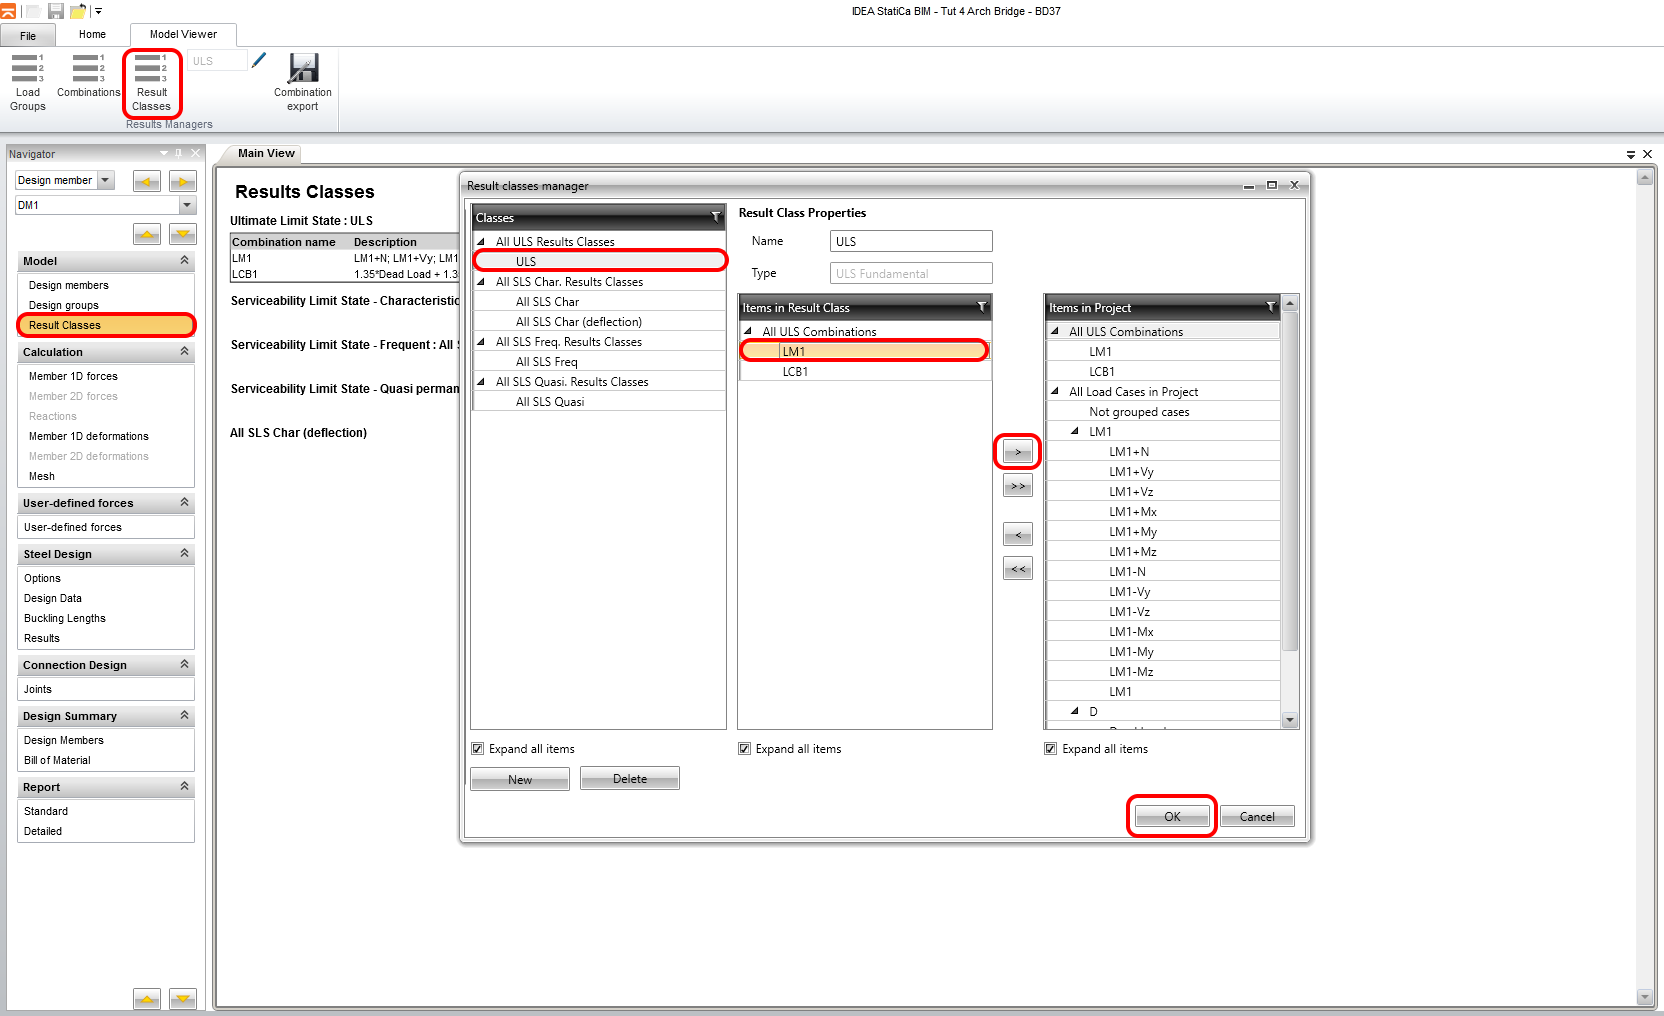
4 Result Classes
The Result class tab serves for selecting combinations that will be included in the code - check. The envelopes from the Moving load analysis will be deleted. The envelopes are included in the combinations LCB1 where are included as static load cases from the Midas Civil.
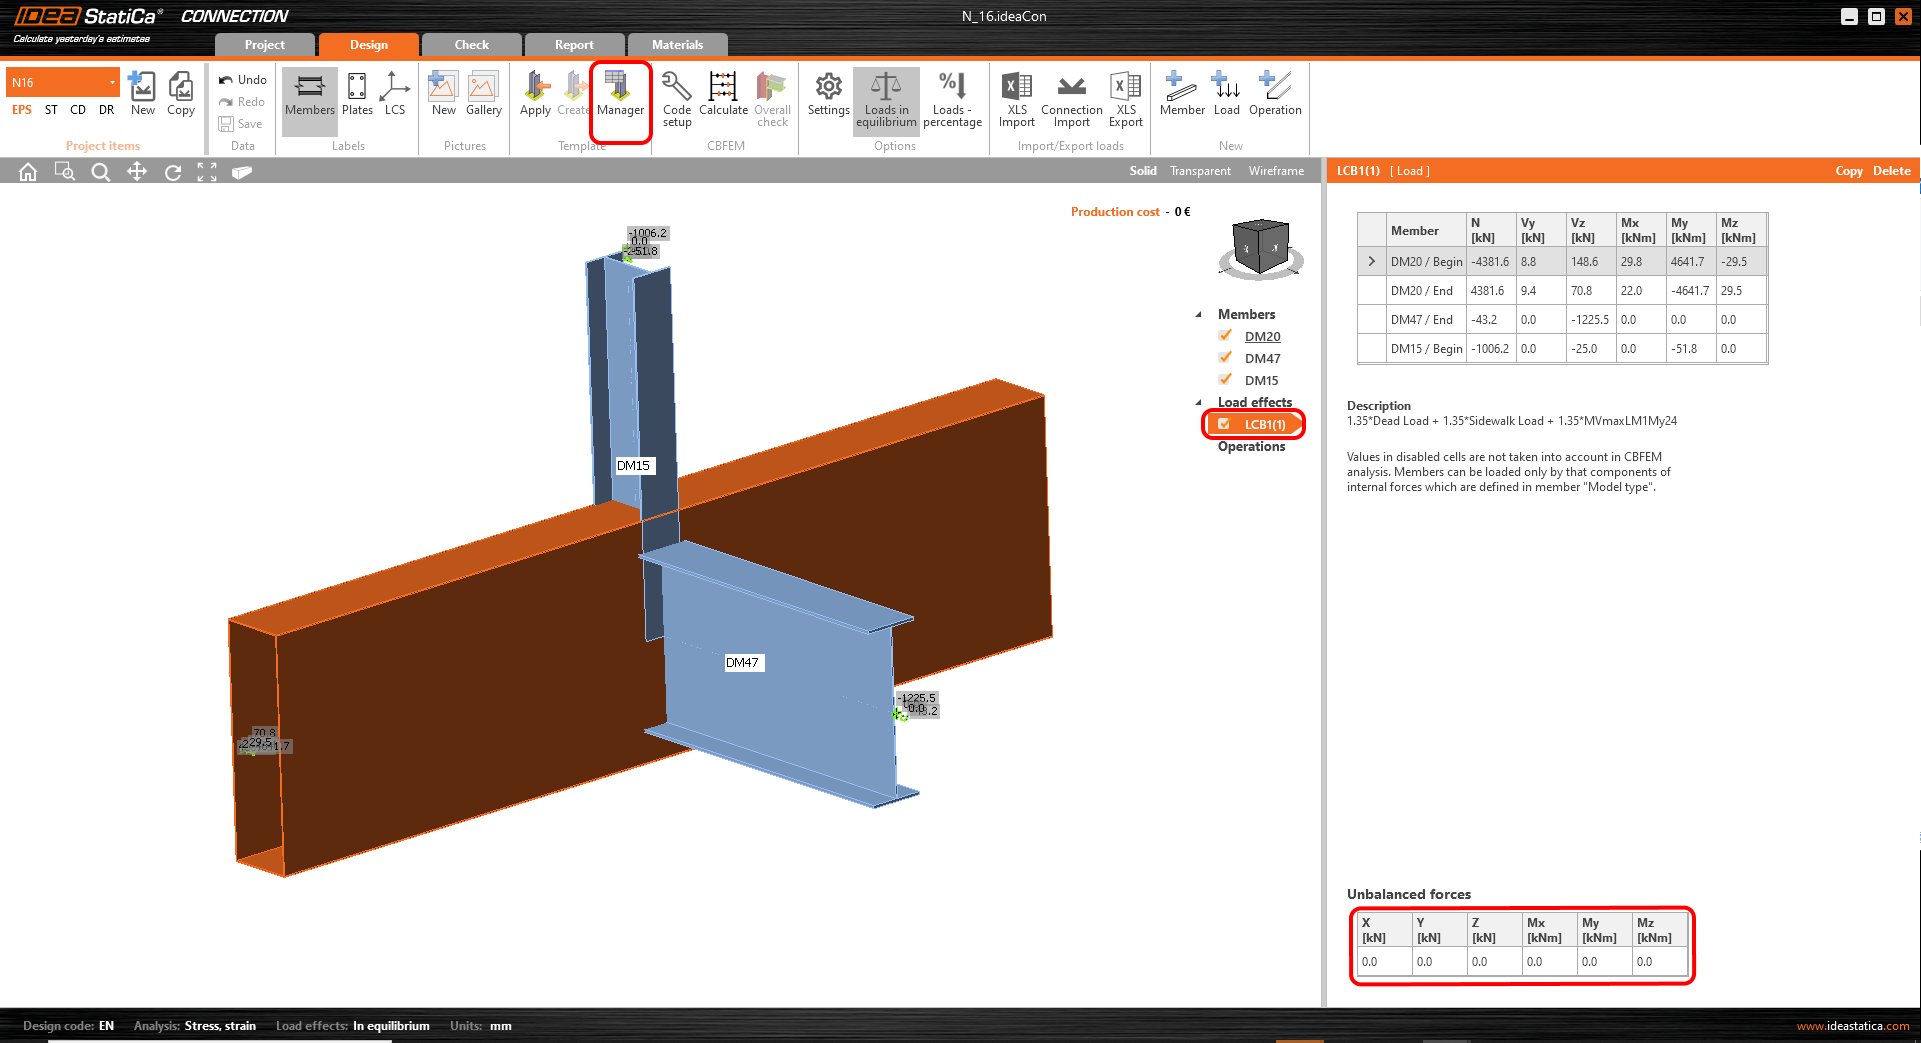
5 Connection Design
Select the node N16 using the New button in the ribbon. The node is located between members 24 and 25. There is also the option to select more than one. You will work with only one node (joint).
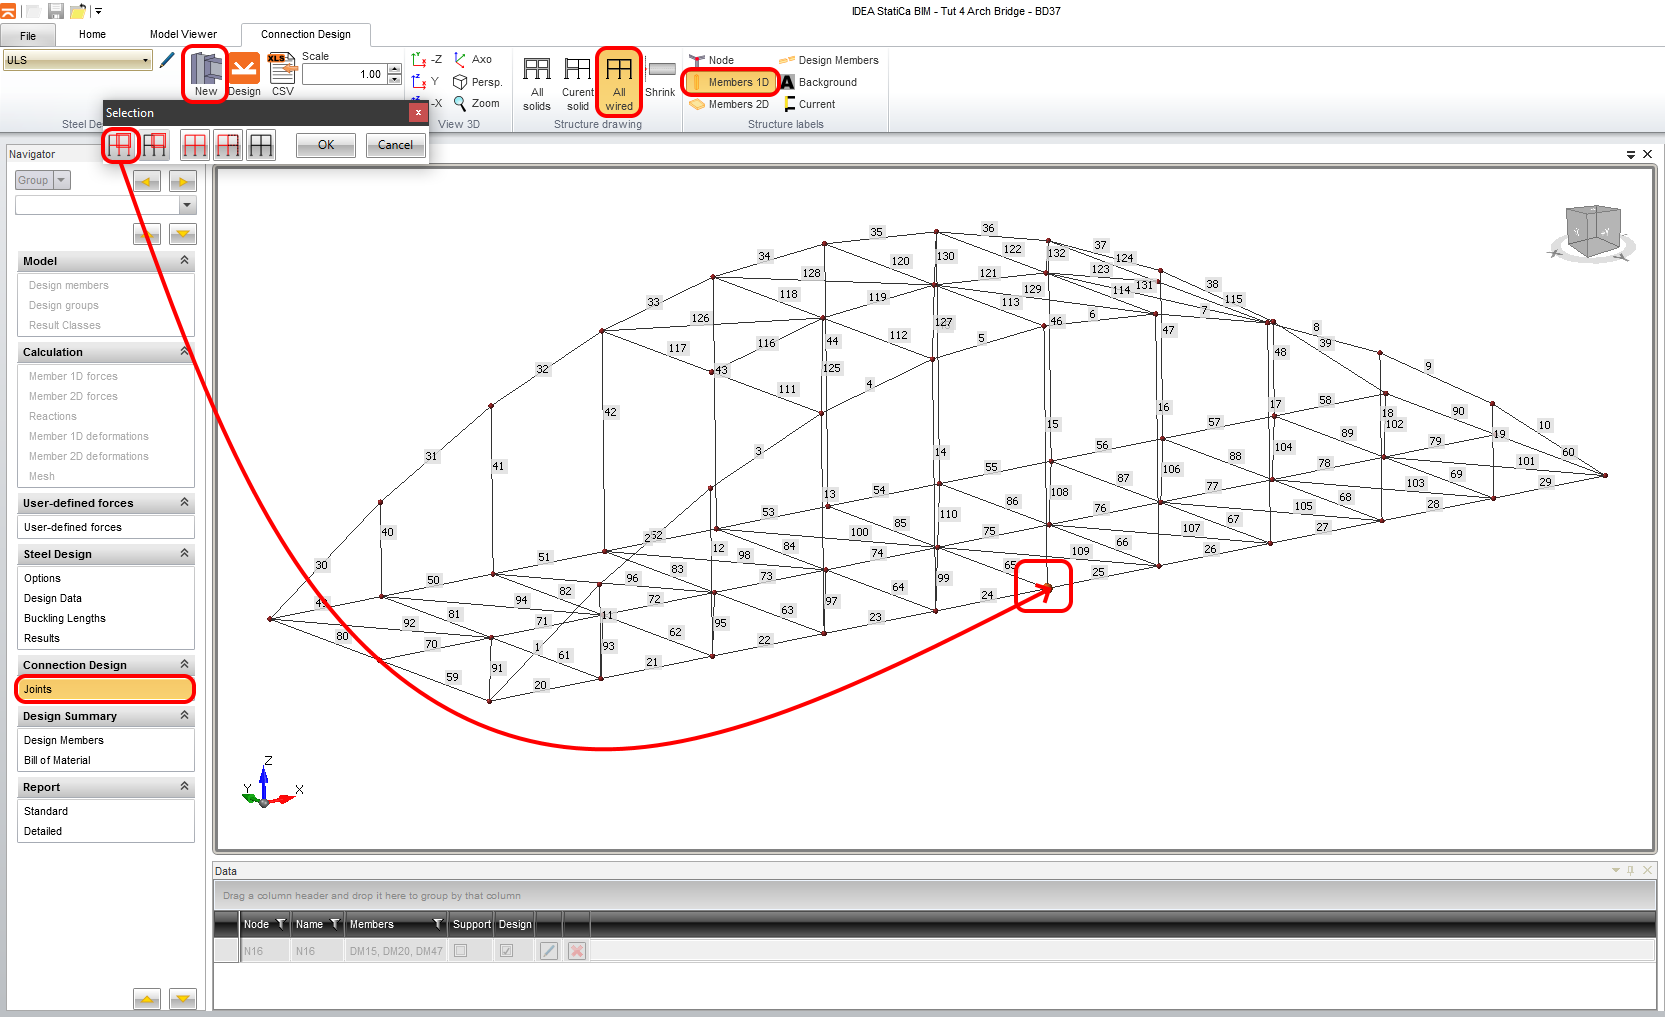
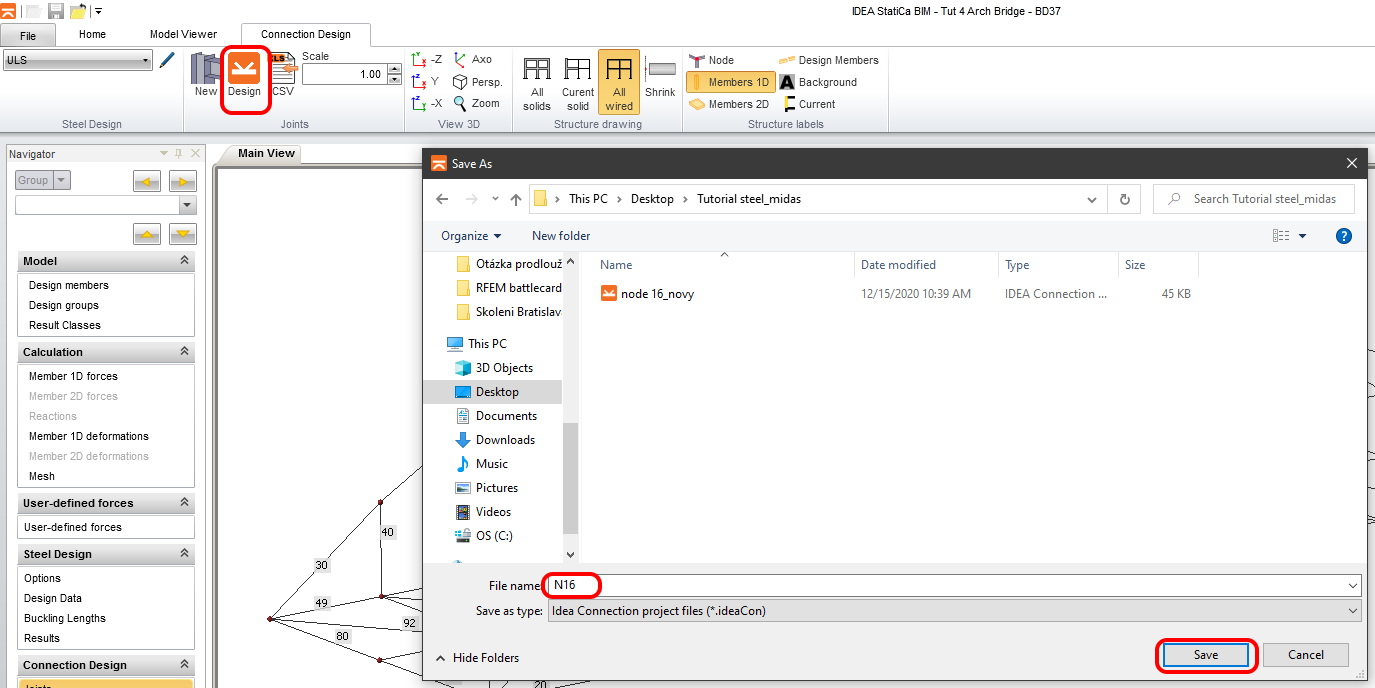
Address the name of the joint for the saving and run the application IDEA StatiCa Connection by usage the Design button in the ribbon.
6 Design
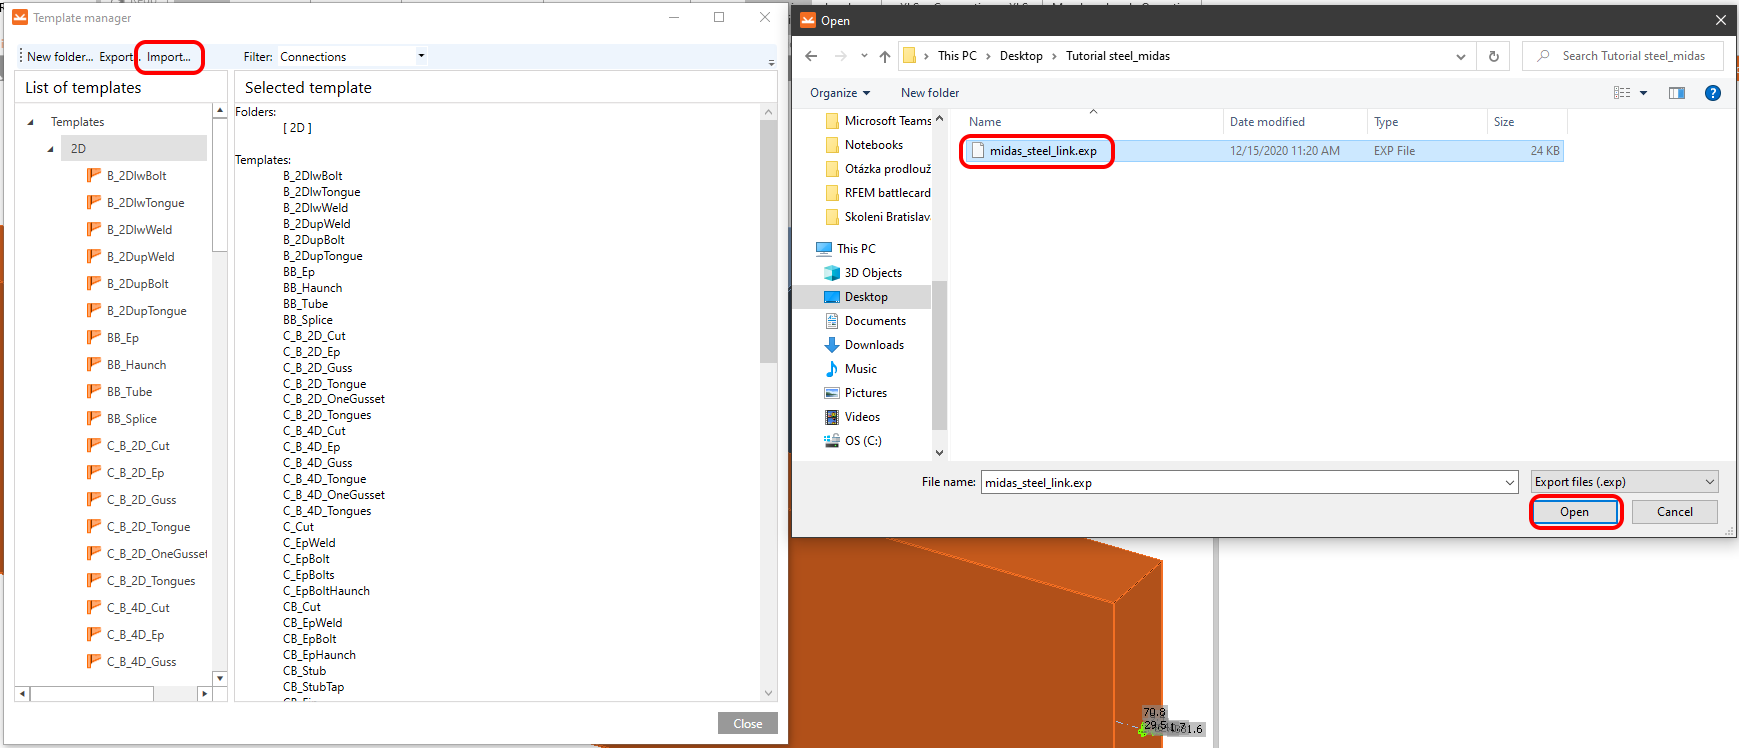
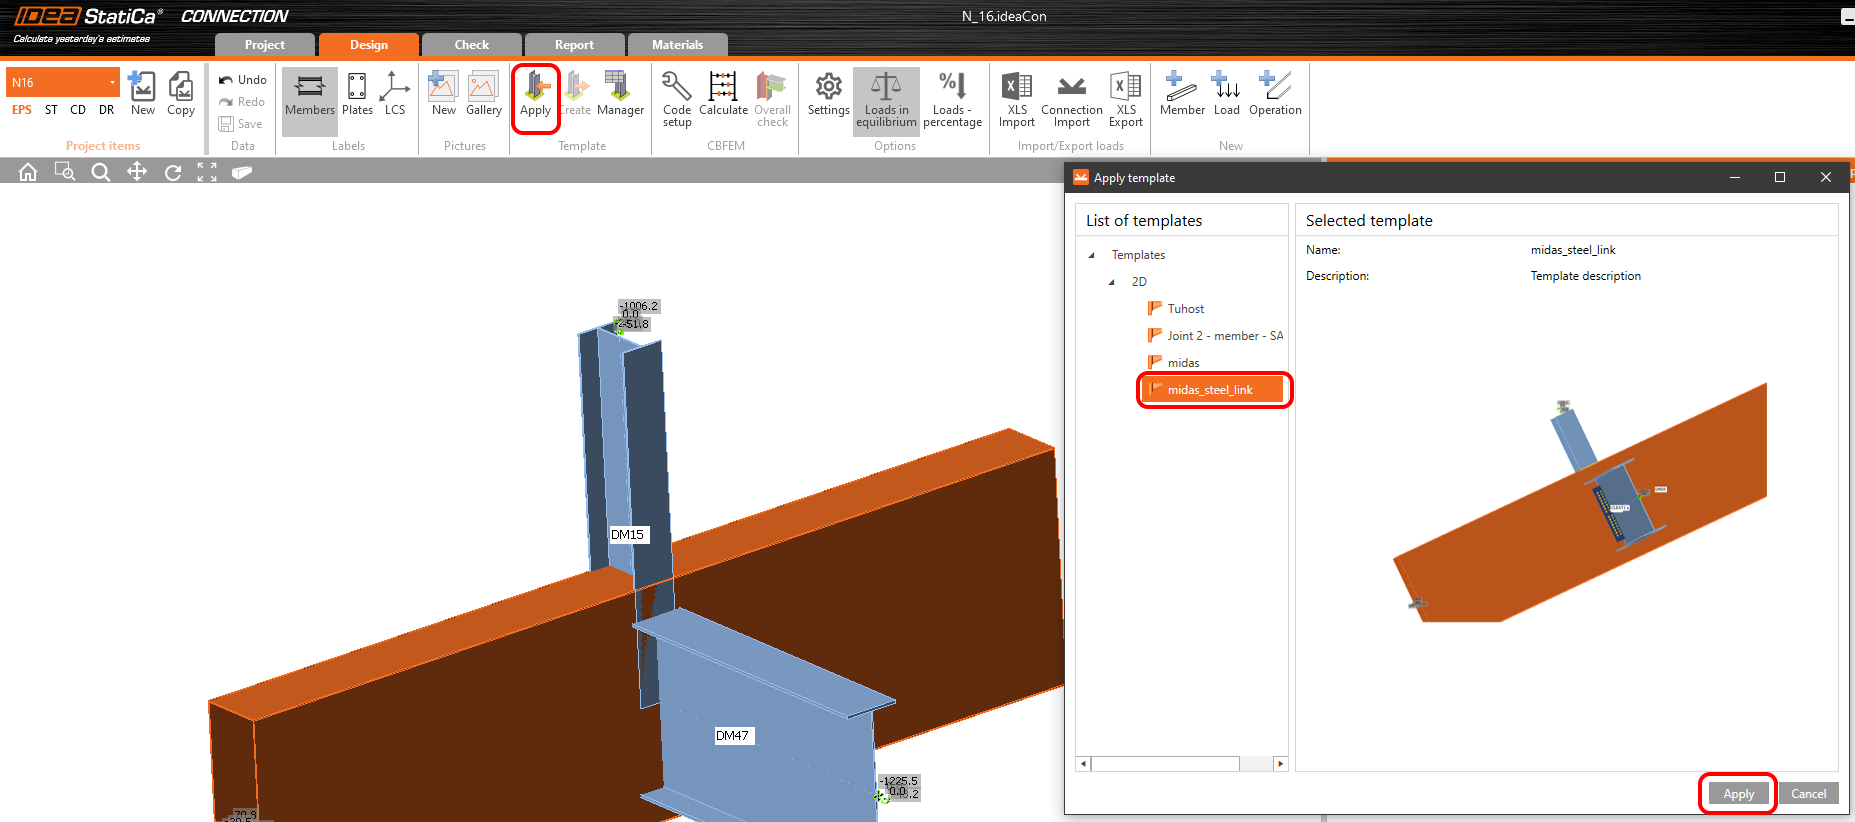
The connection is in the equilibrium. This is an important step for controlling and correctness of your model. You will use the predefined template for this connection. Go to the Manager in the ribbon.
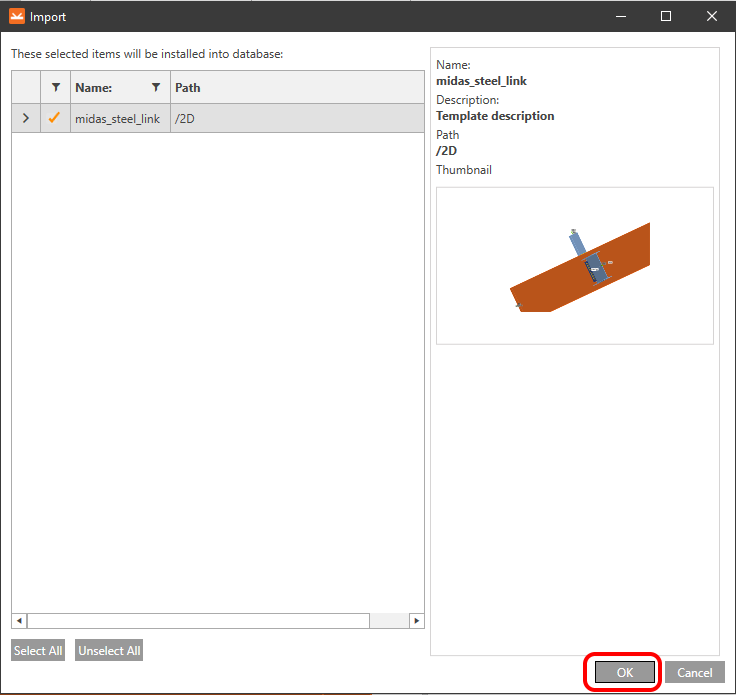
Import the predefined template file midas_steel_link.exp and save it to the local library.
Confirm your selection.
Apply the template to your model.
During uploading the template to your model will appear the dialog where is necessary to set the bolt grade and the profile of the cleat. Let the bolt grade as default and set the dimension of the Cleat.

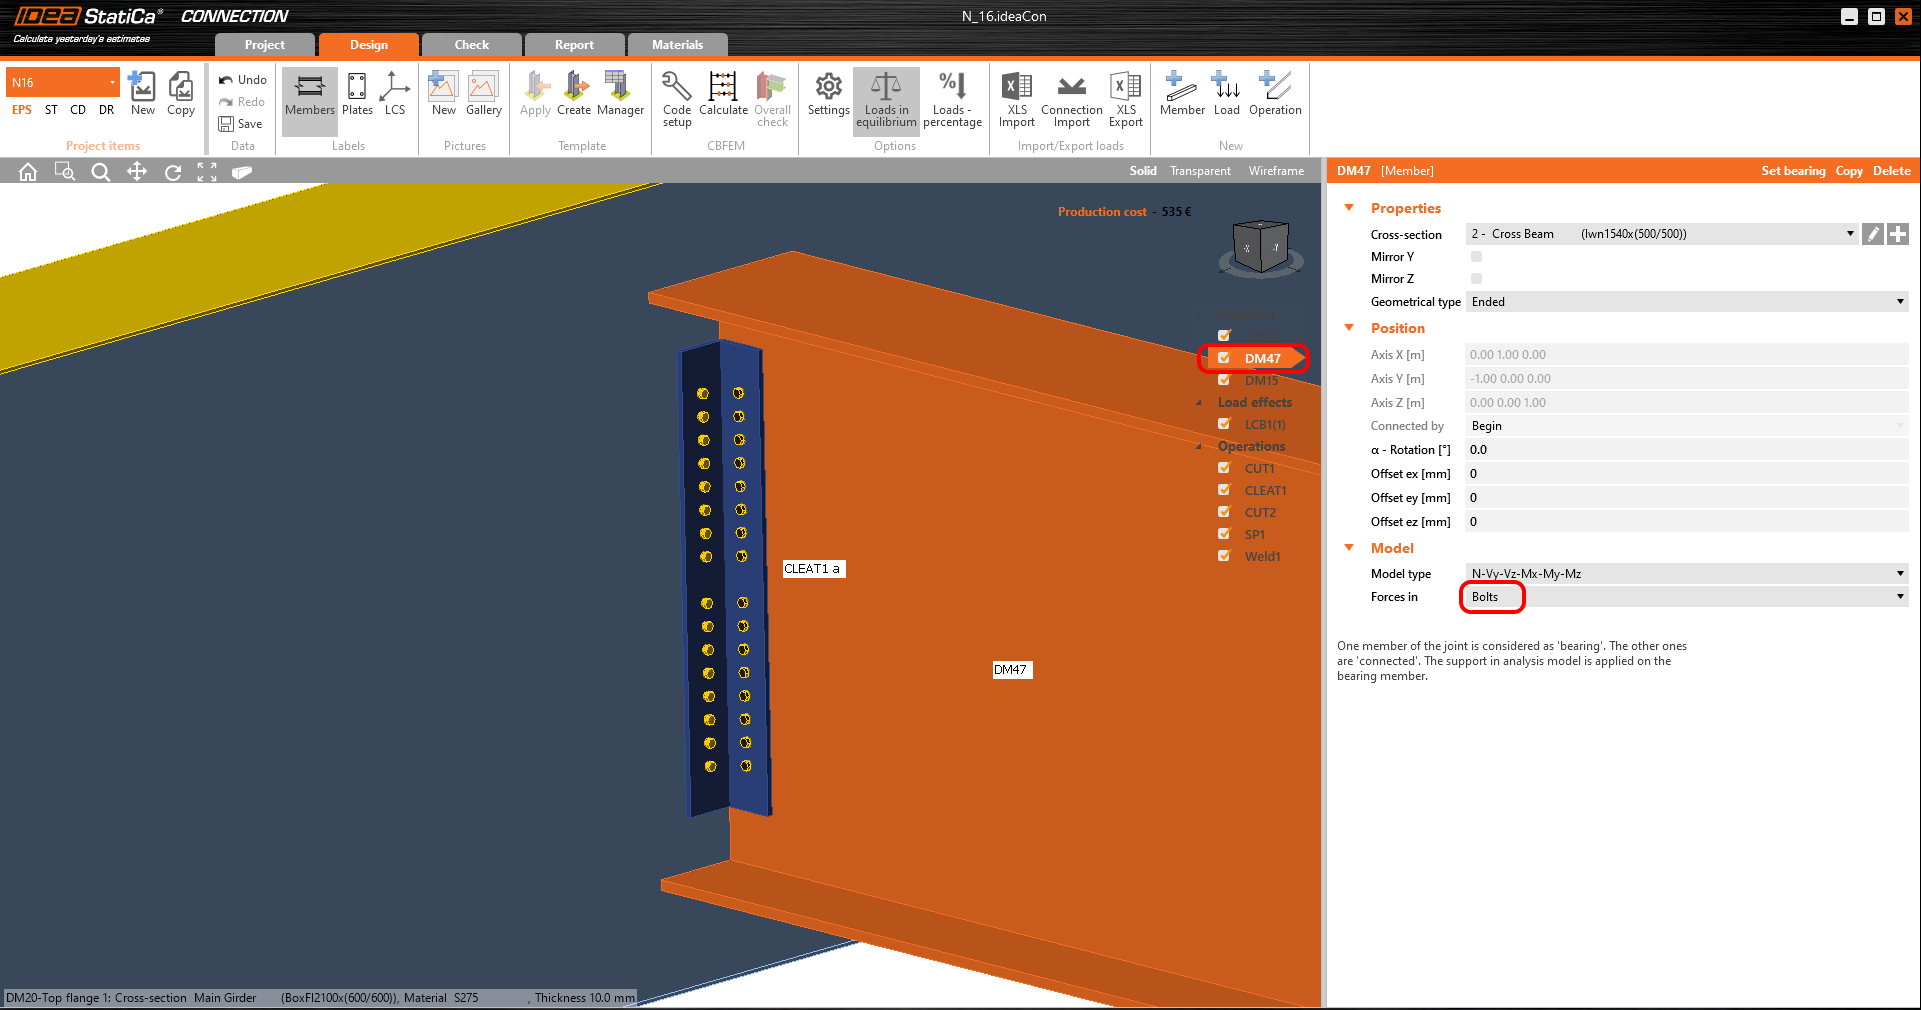
The shear force will be transferred via cleat where are bolts. Change the transferring of the forces for DM47 to the Bolts.
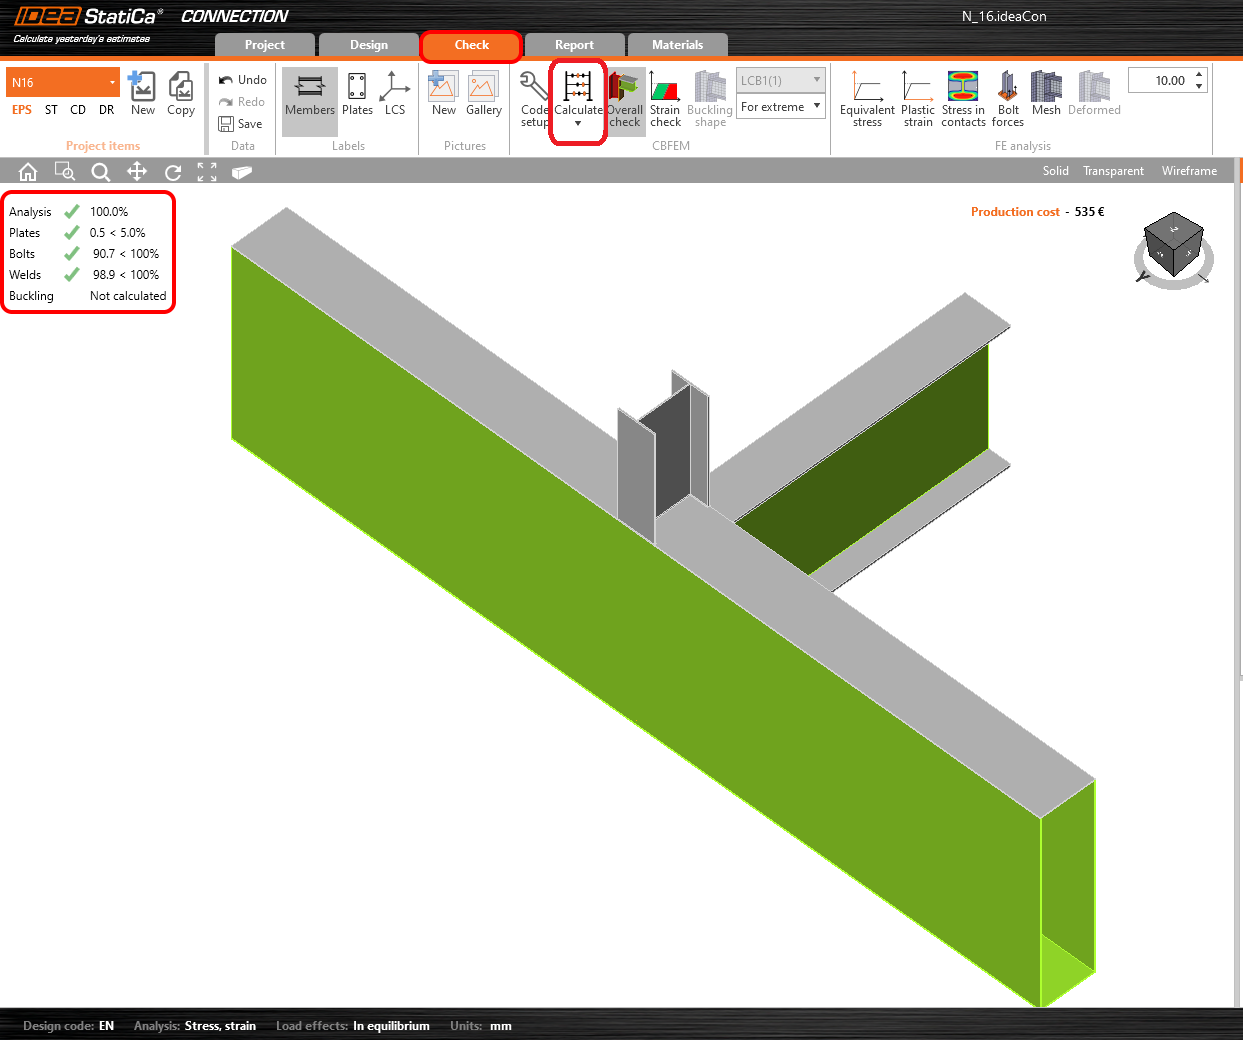
6 Check
Run the analysis. You will obtain results in all components as plates, welds, bolts, and equations according to code where are all results described.
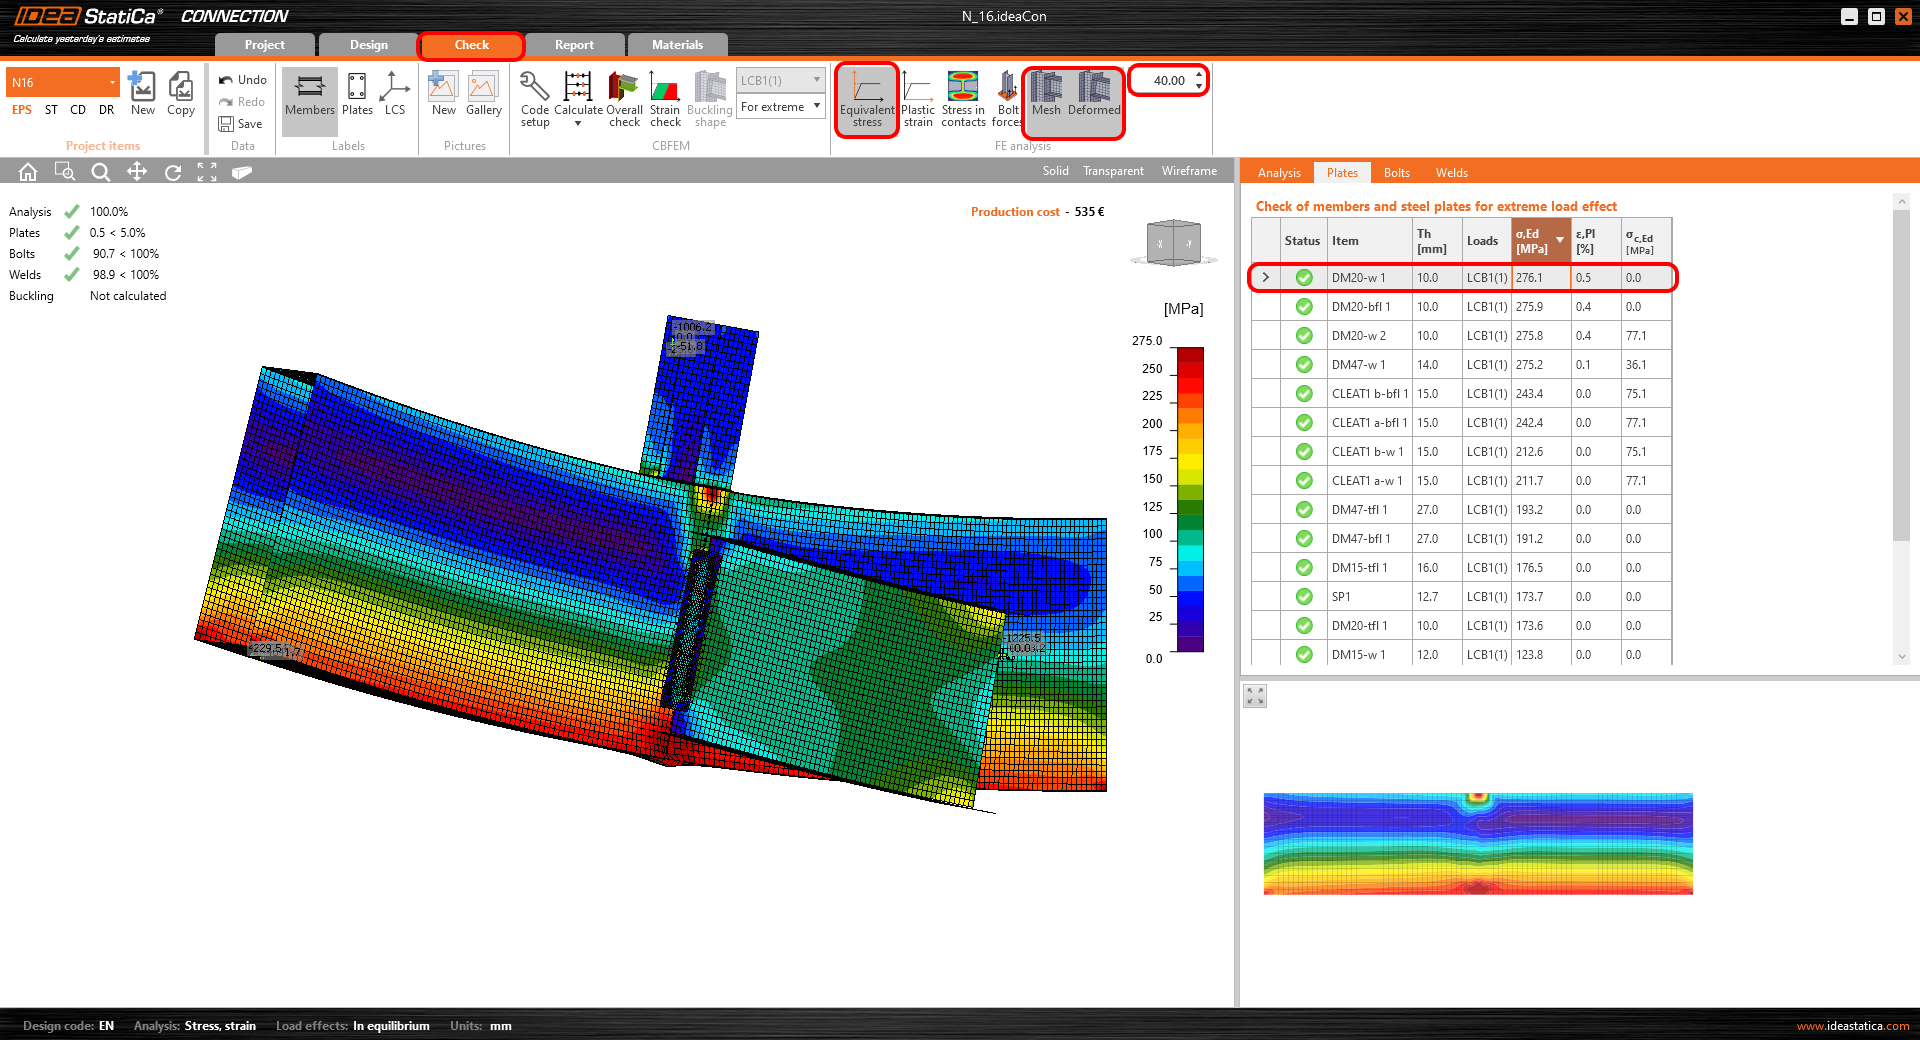
Let's have a look at the equivalent stress on the plates where is turned on the mesh and deformed shape with the tab where are sorted out the stresses gradually from the maximum to minimum.
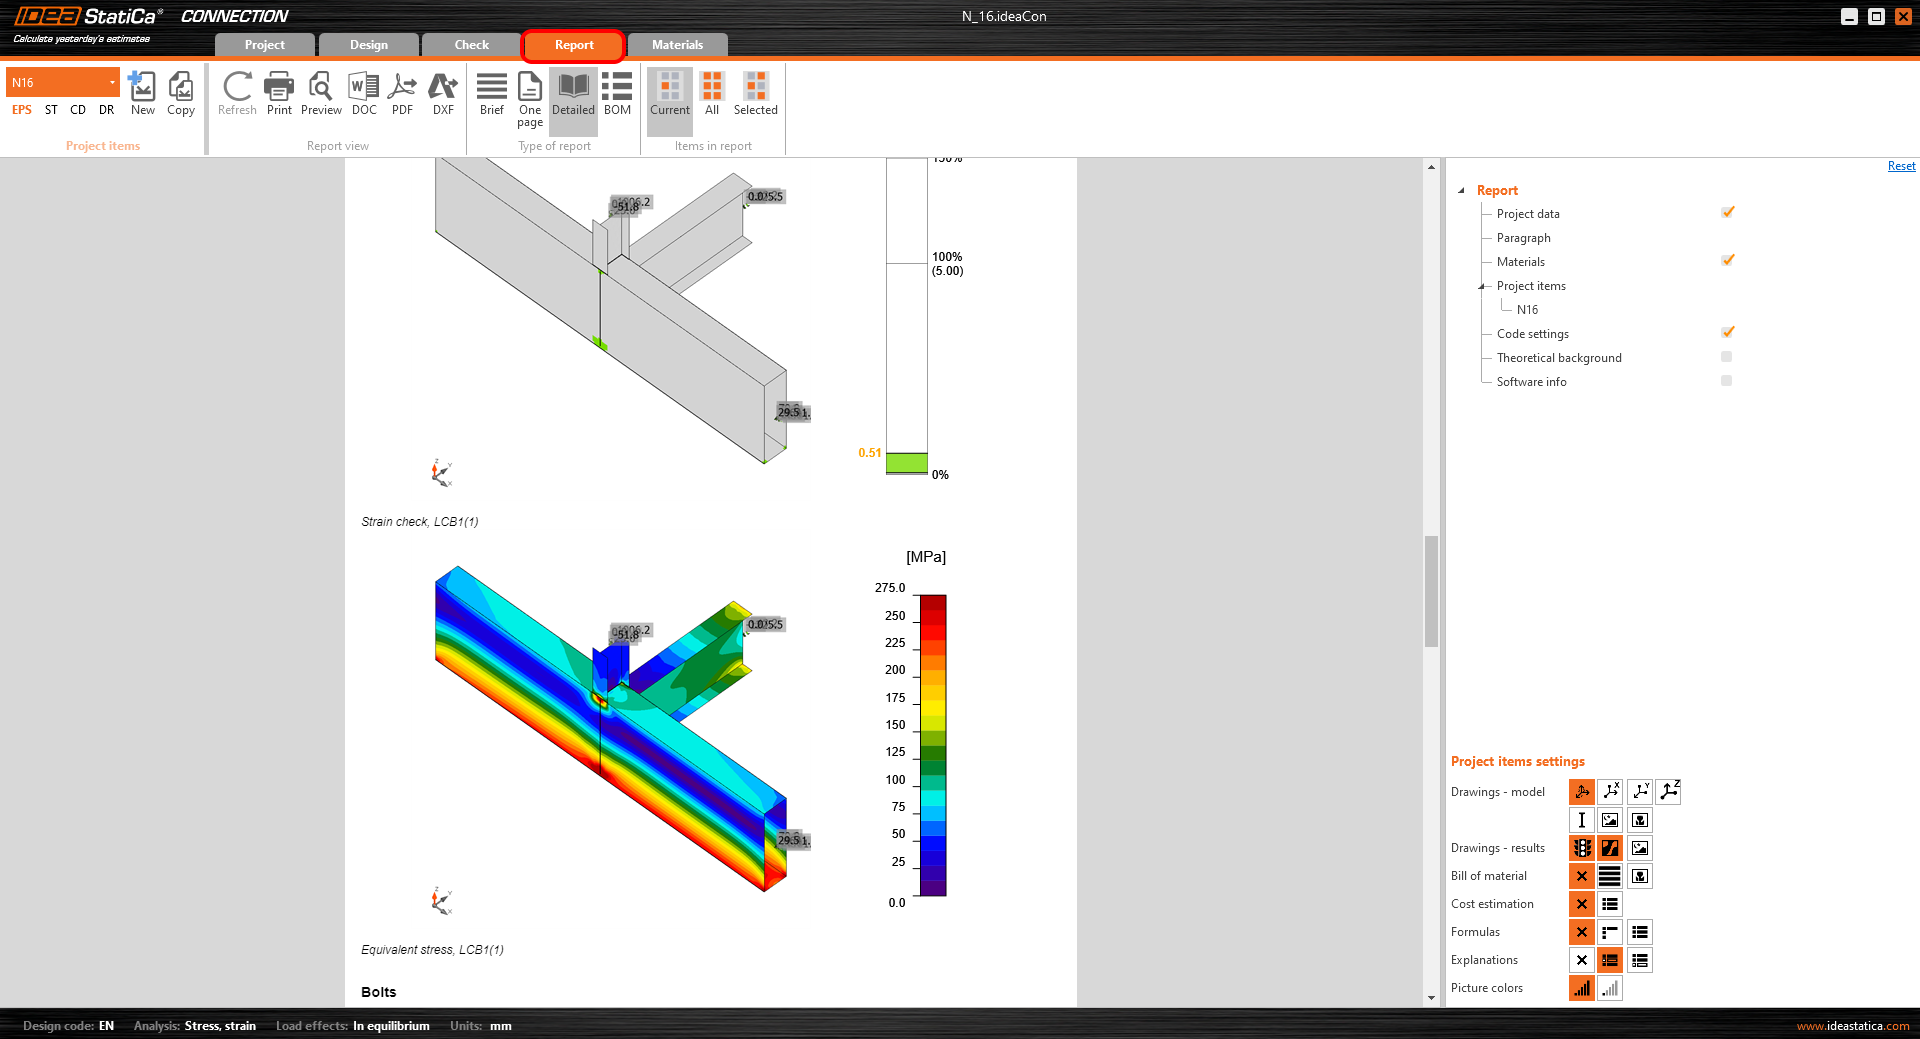
7 Report
Next, go to the tab Report. IDEA StatiCa offers a fully customizable report to print out or save in an editable format. The printed out format can be PDF and doc. file.
Known limitations
Midas Civil is a powerful tool for the calculation of envelopes from moving load or settlement analysis. IDEA StatiCa Connection cannot work with the envelopes from Midas Civil. If you want to do the code - check the combinations with the impact of moving load there is important to create a static load case from the moving load analysis.
Static load case from moving load
For the actual combination LCB1 imposed in the Midas Civil and also in IDEA StatiCa Connection was selected static load case for node 16 and maximal bending moment My on the member 24.
1 Activation
Since the version, Midas Civil 2020 3.2 and newer has been added the activation checkbox to the Program licensing configuration.
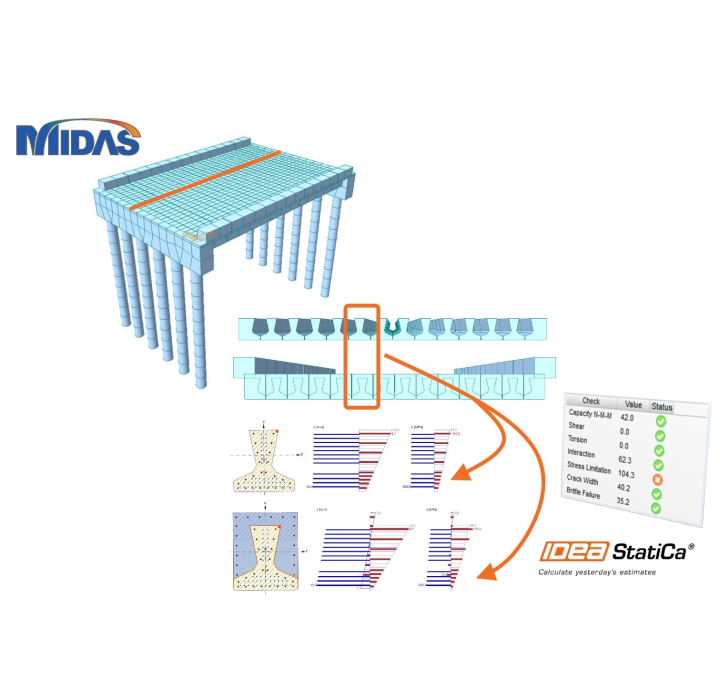
2 Export
Open the attached project compositeT.mcb and run the analysis. After analysis go to the menu tree and select Export and IDEA File.
Select the path where will be saved the mct. and mid. files. Both files are necessary to save in the same folder. Otherwise, the import to IDEA StatiCa BIM won't be accessible.
3 Import
Launch IDEA StatiCa application and move to BIM part. Select the Import from other programs and select the compositeT.mct. The selection of the compositeT.mct will be allowed if you scroll down the menu of supported FEM programs and select Midas mct Files(.mct).
You can sort the design members into groups. It's suitable from the design point of view. The members assigned to one group are checked at the same time.
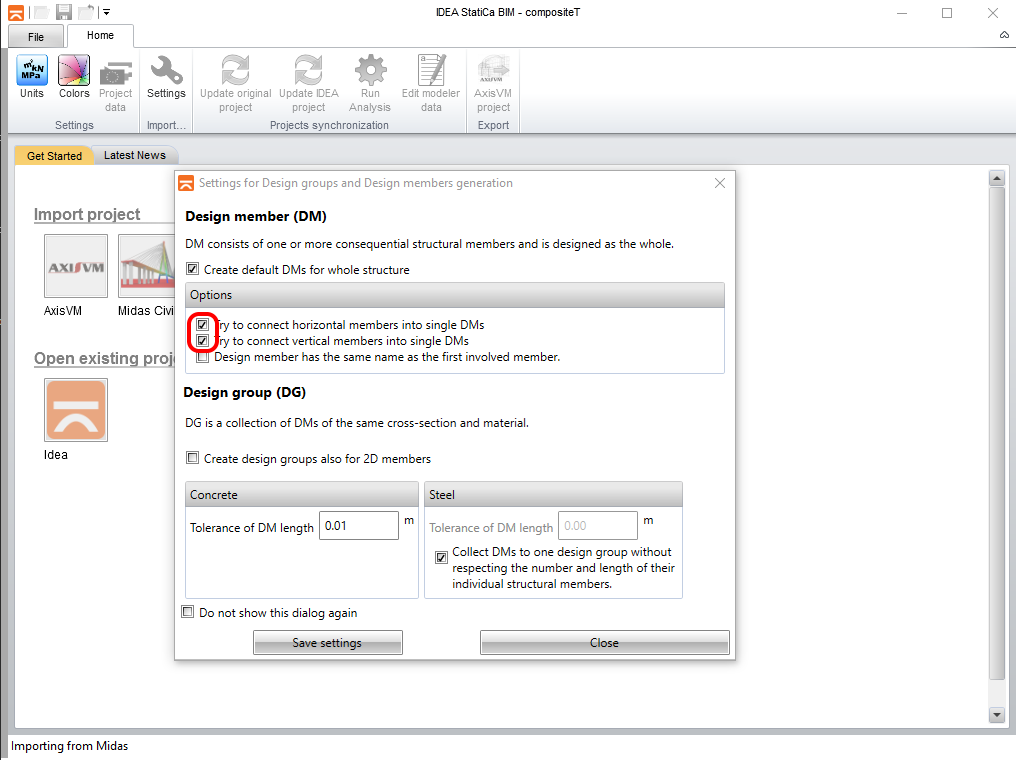
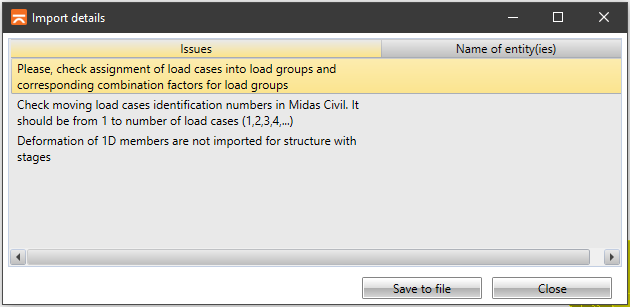
The Import details tab is being informed you what is highly recommended to control or what is not taken over from the Midas Civil.
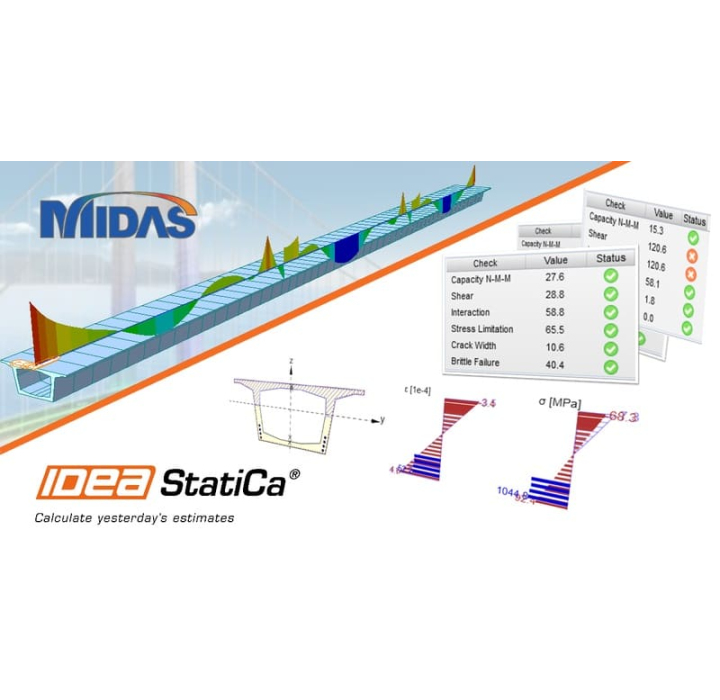
Due to the bridge T-section beam, it is necessary to select the appropriate code. The Project data provides the settings of the code EN 1992-2:2008-07. The load groups set for the Road bridge in the Type of bridge scroll menu.

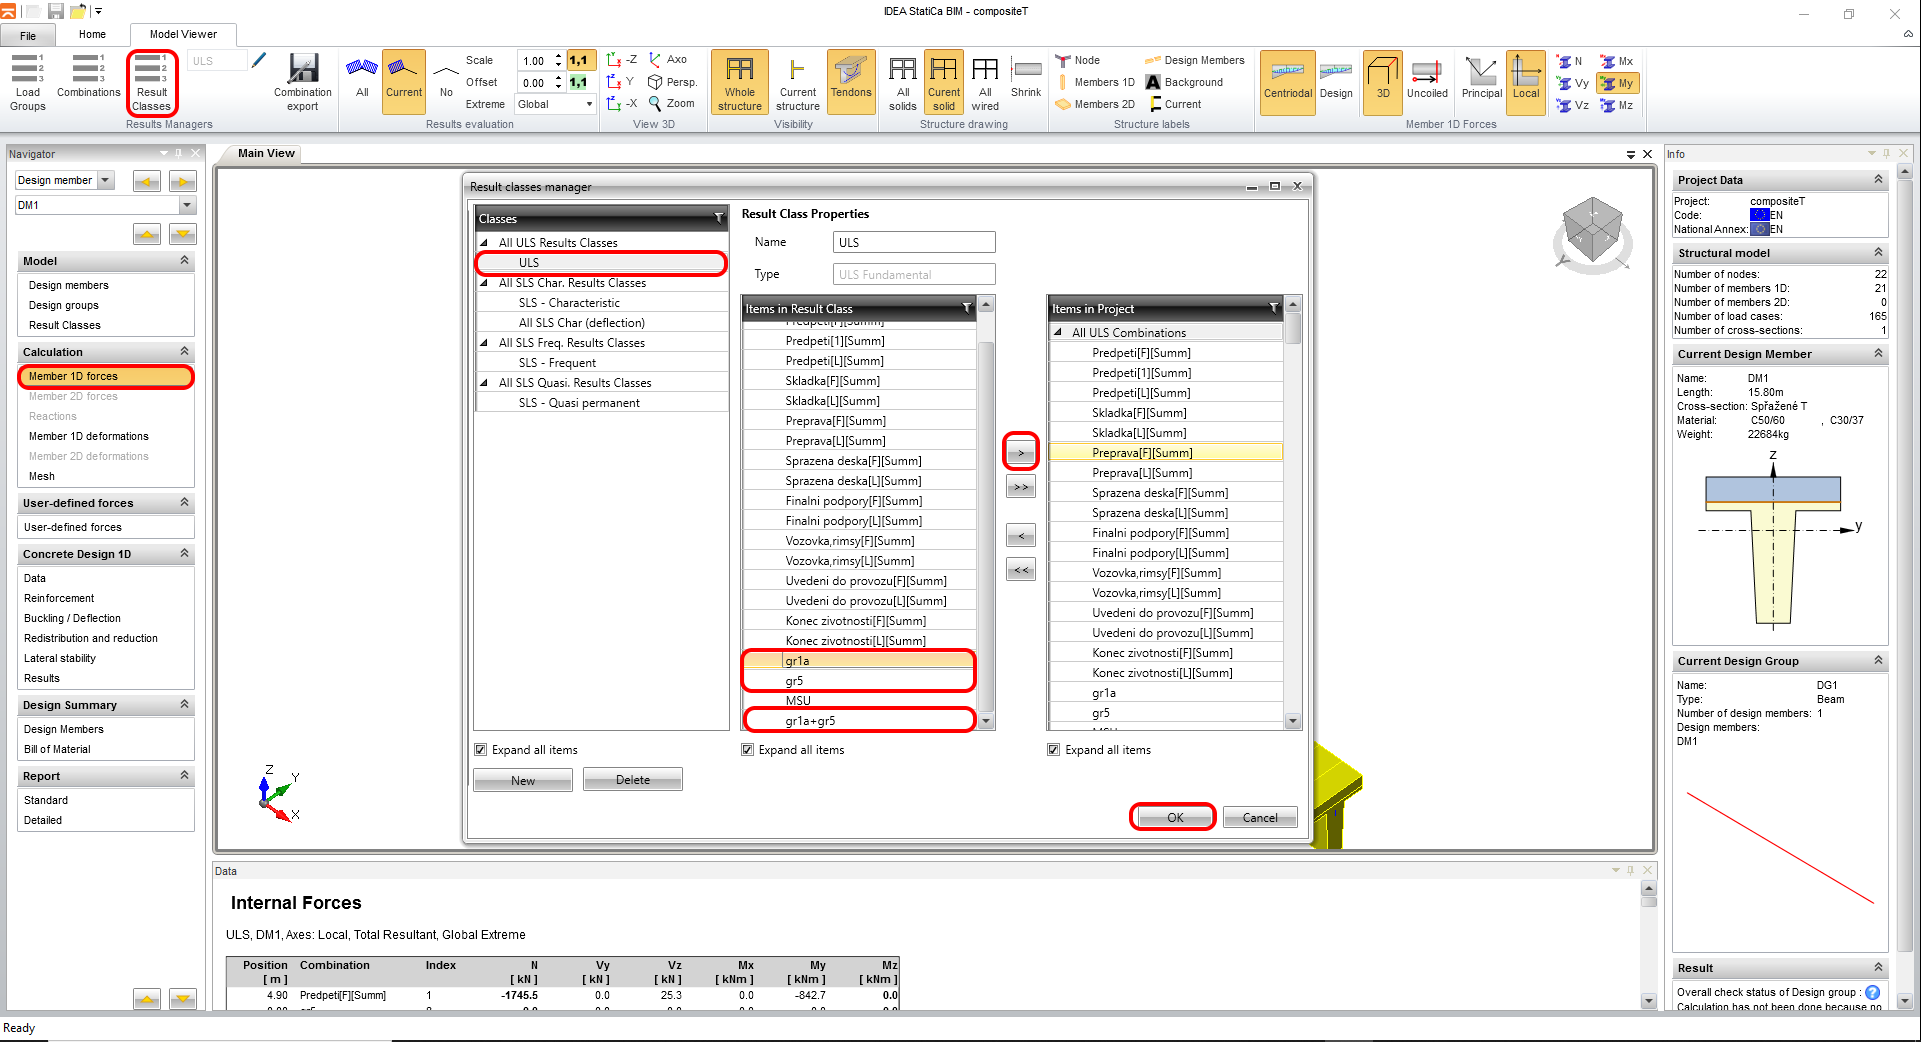
The Result class tab serves for selecting combinations that will be included in the code - check. The envelopes from the Moving load analysis will be deleted because are not sorted to the construction stages and are not important for code - check as the standalone combinations. The envelopes are included in the other combinations with permanent load cases.
4 Design
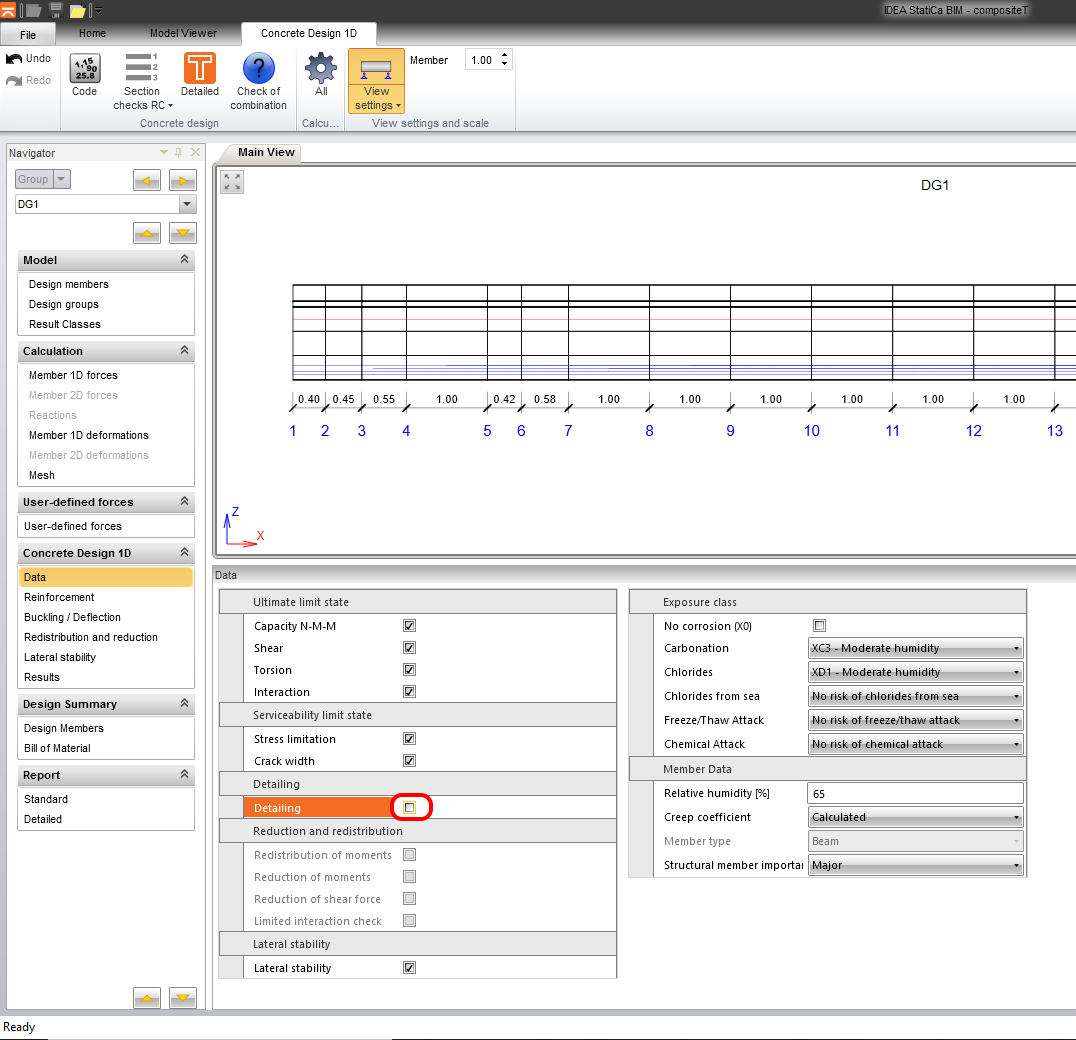
In the Data card are predefined significant code -checks. The Detailing is turned off due to the average tendon for every layer. The insufficient distance of tendons due to the simplification of the FEM model.
The upcoming stage is Reinforcement. To make it easier you will work with one zone across the whole beam. Press the cross-section in the scene and you get to the reinforcement editor.
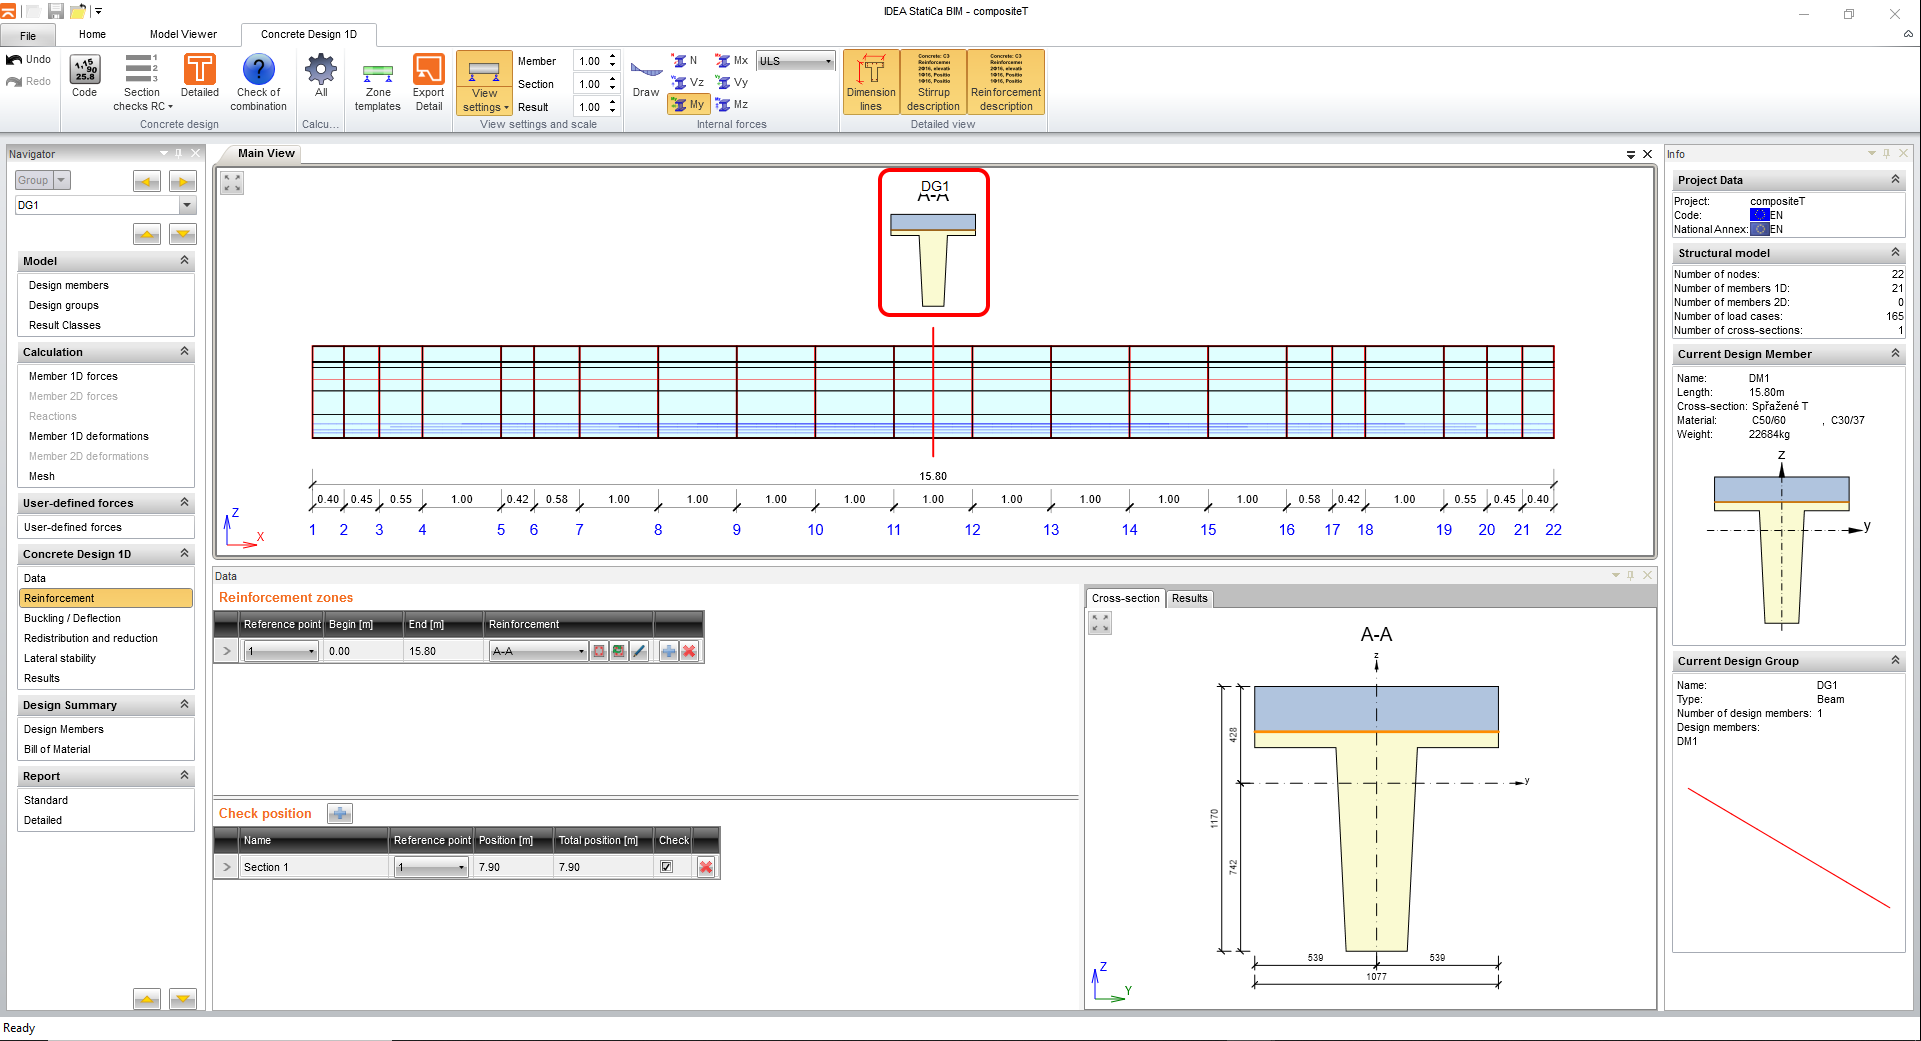
Load the predefined cross-section template compositeT.nav and insert it.

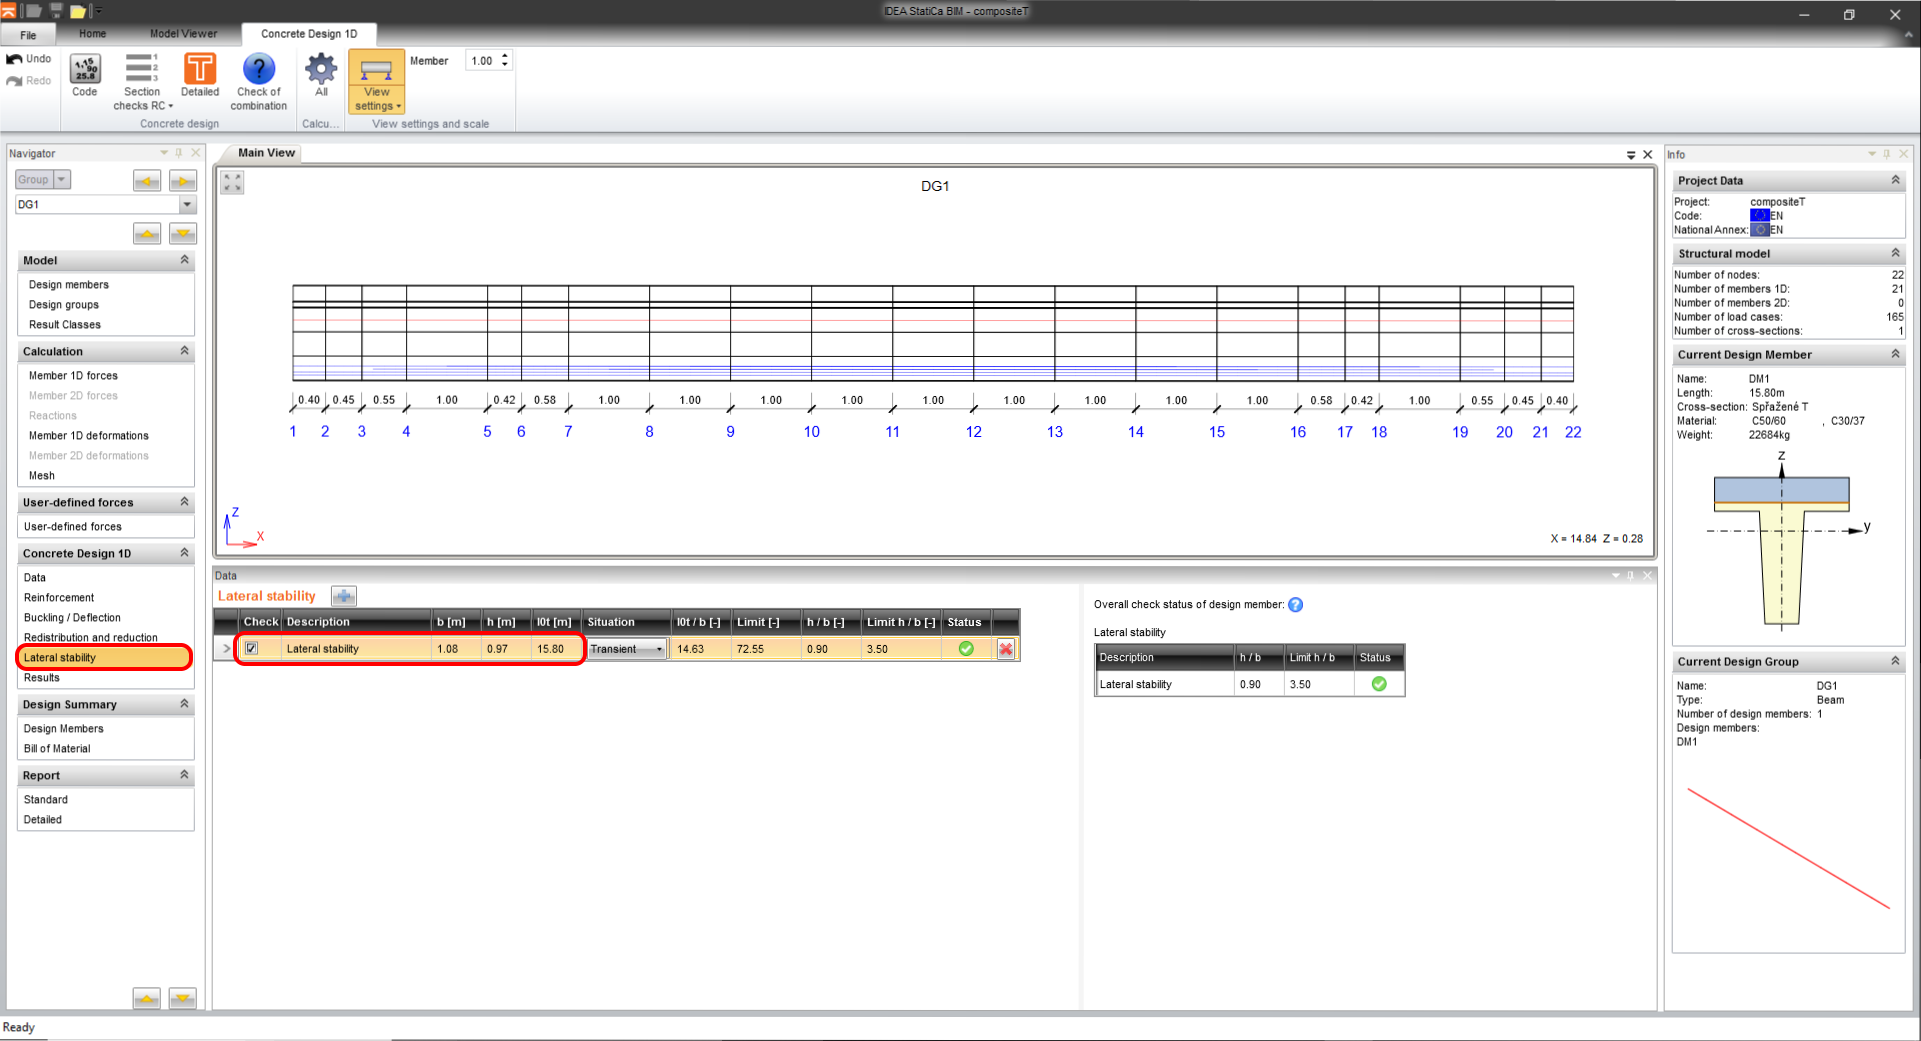
The lateral stability check is a really important part during the stage of prestressing to prevent the snap-through point of the beam. Move to Lateral stability and set parameters for code- check. Change the situation to Transient.
b = 1,077 m
h = 0,97 m
lt = 15,8 m
5 Results
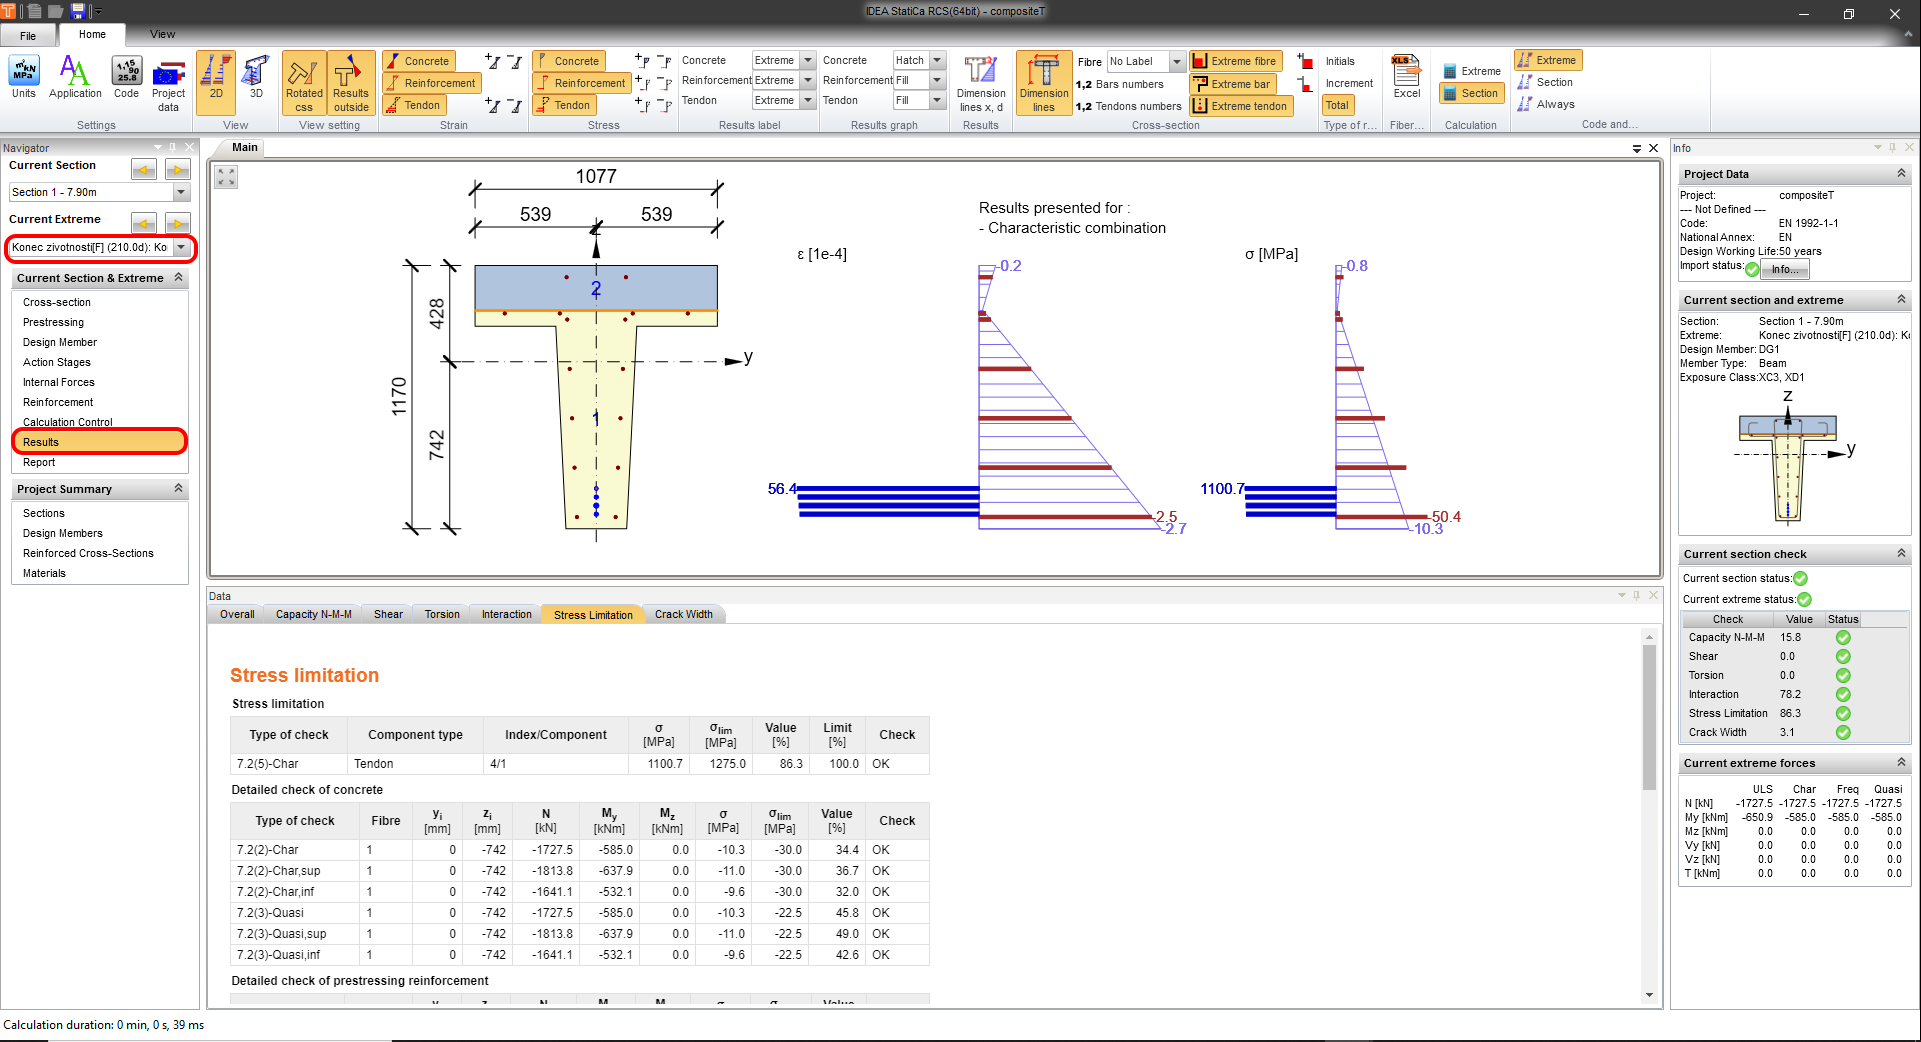
Switch to the Results card and the calculation is being automatically started. You reach detailed results if launch module RCS by clicking on the Detailed button.
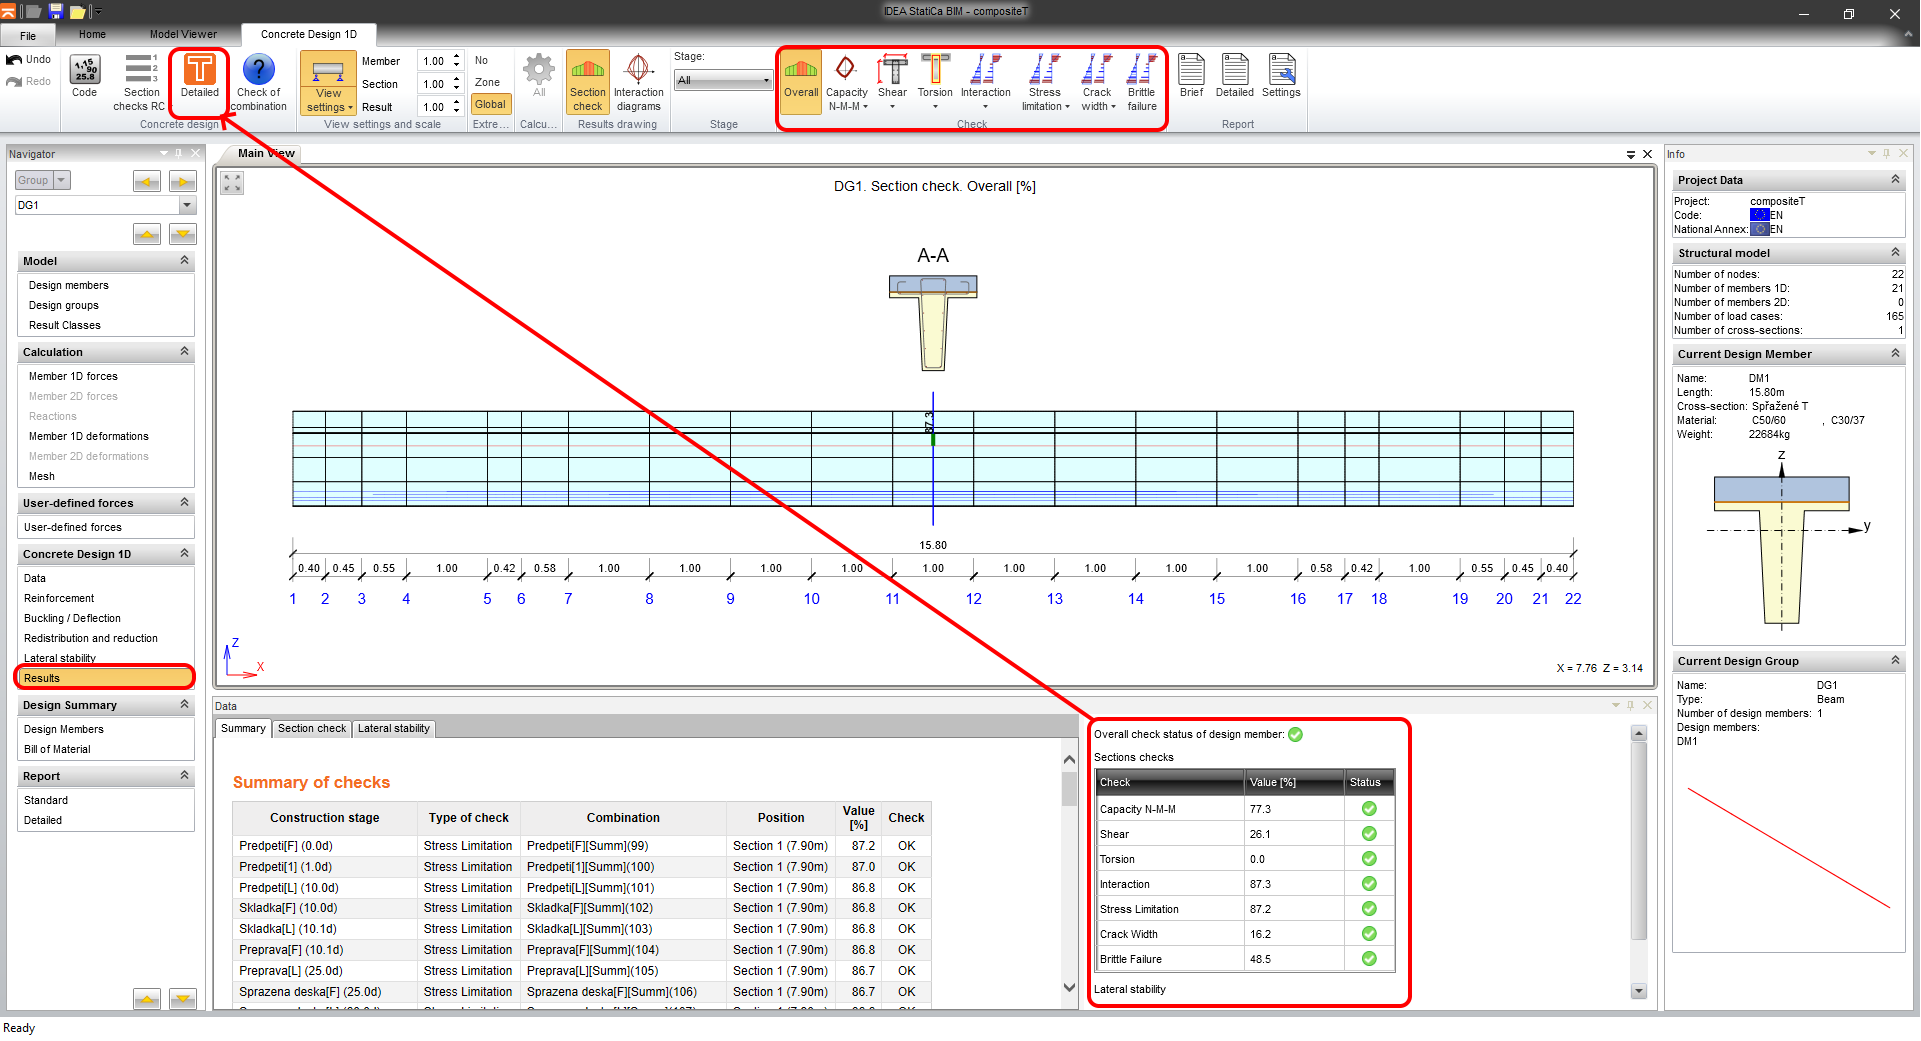
Run the Calculation.

The Results card offers in the navigator tree detailed results drawing. In the upper part is located a switcher between stages and sections for selection of the desired part. Actually are presented the results of the prestressing stage without a composite slab.

The change of the stages is performed via a switcher of stages. The stages with the composite slab. The module will be closed by the cross button usage.
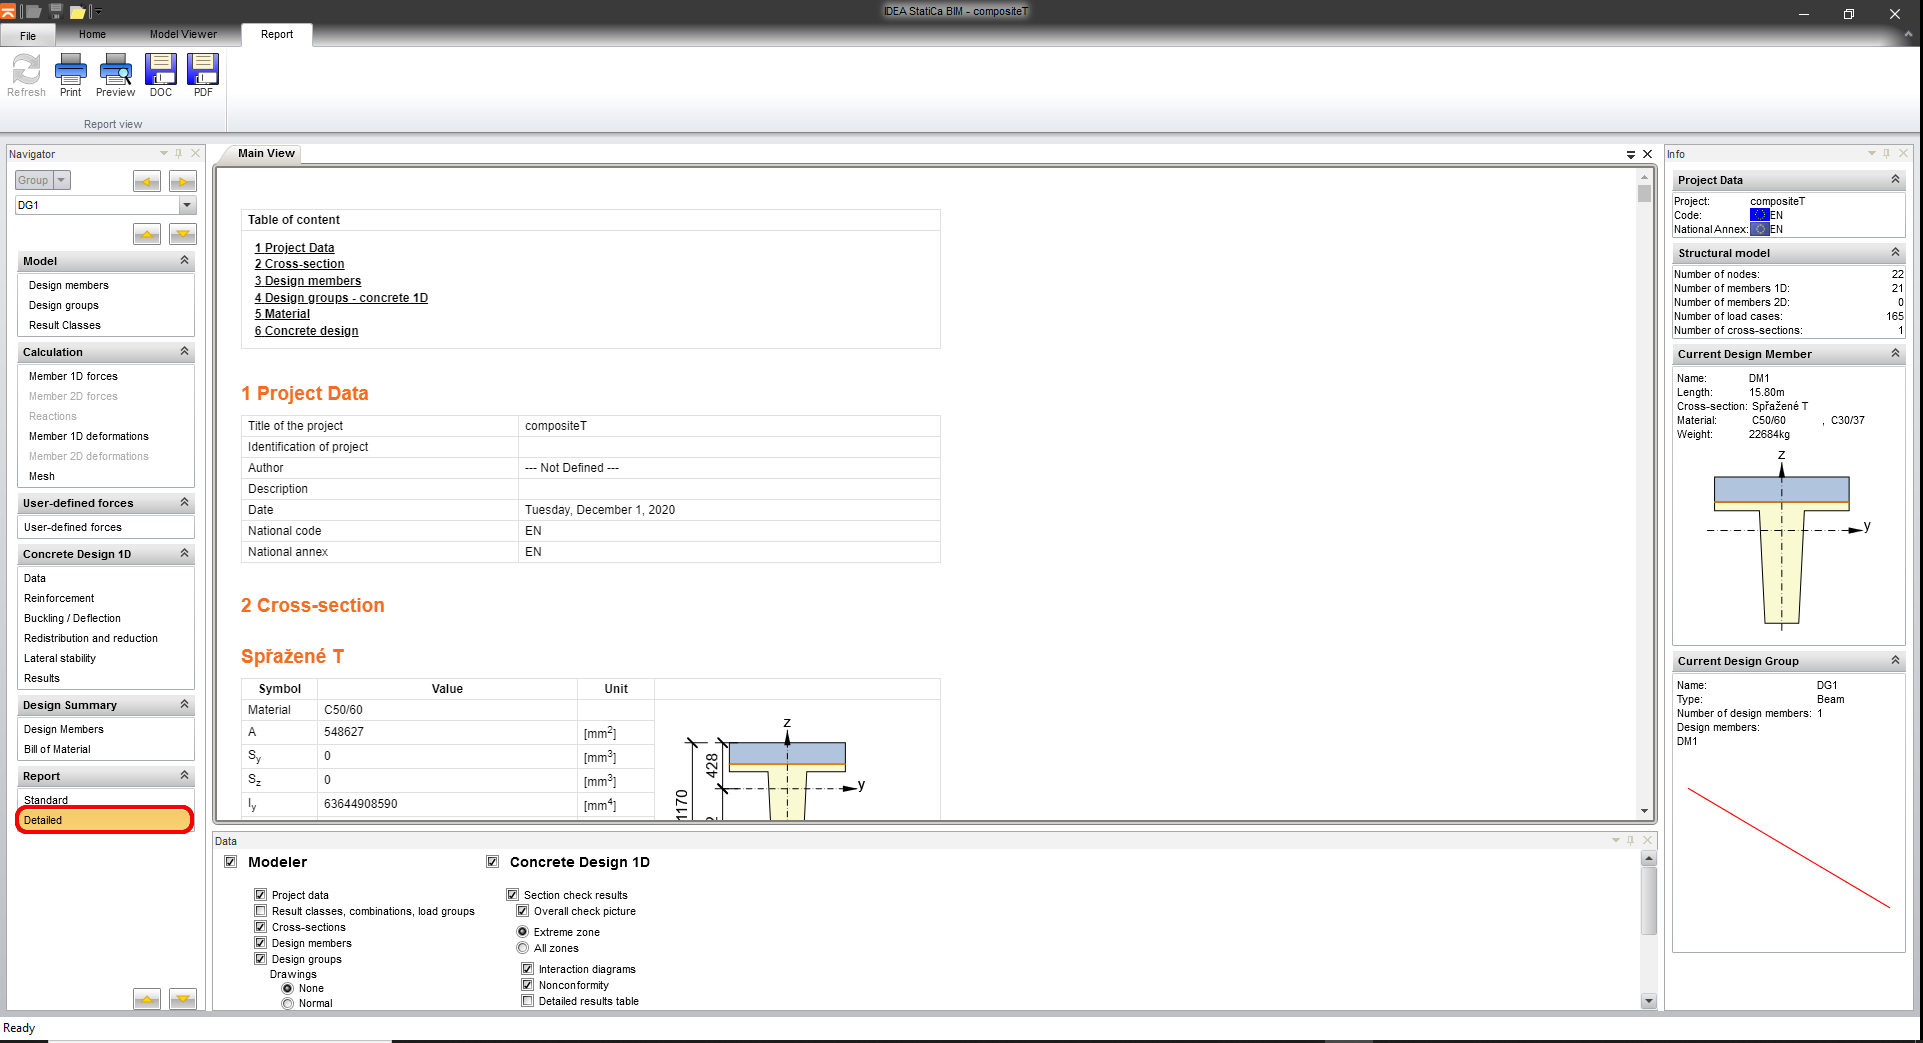
6 Report
The final step is printing the report. The report can be brief or Detailed it depends on your intentions. The protocol is fully customizable and can be exported to PDF or Docx. file.
IDEA Statica FREE Download
Please fill in the form below and we will send you an email with the link to download the FREE version of the software and all the instructions to the email address you entered.
Information request
Please fill in the following form, our staff will answer as soon as possible to the email address you entered.
News, events and promotions

Eiseko partecipa a STESSA2024!
Al via da oggi a Salerno la Conferenza internazionale STESSA2024, promossa dal Dipartimento di Ingegneria Civile DICIV Unisa. La Conferenza - alla…


IDEA StatiCa festeggia i suoi 10 anni di CBFEM e dal rilascio di IDEA Connection!
UN DECENNIO DEDICATO ALLA PROGETTAZIONE AVANZATA DELLE CONNESSIONI Festeggia con noi i 10 anni di progettazione delle connessioni con IDEA StatiCa e…

IDEA StatiCa festeggia i suoi 10 anni e rilascia la nuova v24.0
E' stata uscita la nuova versione 24.0 di IDEA StatiCa. Festeggiamo i 10 anni dal rilascio del metodo CBFEM e di IDEA StatiCa Connection e…